You can safely brighten wood by first cleaning and testing a hidden spot, then choosing gentle brighteners (diluted hydrogen peroxide or oxygen bleach) for lightening or oxalic acid for rust/water stains. Wear gloves and a respirator, work in a ventilated area, rinse and neutralize after each step, dry and sand lightly to smooth raised grain, then seal promptly. Follow up with repeat spot treatments as needed—keep going and you’ll find detailed tips and troubleshooting next.
Quick Step-By-Step: How to Whiten Wood Safely
Before you begin, make sure you’ve got gloves, eye protection, a well-ventilated workspace, and a neutralizer (like a mild vinegar solution) on hand; these keep you safe and guarantee the whitening works properly.
Start by cleaning the surface with mild soap and water, drying it thoroughly.
Begin by thoroughly cleaning the surface with mild soap and water, then dry completely before proceeding.
Sand lightly with fine-grit paper to remove finish and open the grain, wiping dust away.
Apply an oxalic acid solution or wood bleach per instructions, letting it work until the stain lifts.
Rinse and neutralize, then sand smooth once dry.
Finish with a protective sealer suited to the wood.
Decide: Subtle Brightening vs Full Bleaching
When deciding whether to aim for a subtle brightening or full bleaching, think about the look you want, the wood species, and how much of the original character you’re willing to lose.
Subtle brightening lightly lifts surface discoloration, preserves grain contrast, and needs gentler agents or diluted peroxide—ideal for antiques or softer woods.
Full bleaching strips deep stains and tannins, yielding a pale, uniform canvas but reducing natural patina and sometimes flattening grain.
Choose subtle when you want character intact and minimal prep; choose full when you plan to refinish, paint, or need a dramatic, consistent lightening result.
When to Choose Cleaning Versus Bleaching for Wood
If the discoloration is a surface stain you’ll usually get better results by cleaning rather than bleaching, so start with gentler methods first.
Consider the wood’s finish and species—some finishes won’t tolerate harsh cleaners, and some woods react poorly to bleach.
You’ll save time and avoid damage if you match your method to whether the issue is surface-level or structural.
Surface Stain Versus Damage
Although stains and structural damage can both darken wood, you’ll treat them very differently. You’ll inspect the surface first: light marks, spills, or finish discoloration usually respond to cleaning or mild bleaching; deep gouges, rot, or blackened grain need repair or replacement.
- Clean: use gentle detergent, oxalic or wood cleaner for surface tannin stains.
- Test: try a small hidden area to see if cleaning lifts the mark.
- Bleach: apply only when staining persists after cleaning and wood is structurally sound.
- Repair: replace or fill damaged sections before any whitening.
Finish And Wood Type
Because the finish and species determine how wood responds, you’ll choose cleaning or bleaching based on what’s on and in the wood: surface finishes (varnish, shellac, lacquer) usually block cleaners and need stripping before any bleach.
While unfinished or soft-grained woods (pine, oak) absorb stains and may take oxalic or dilute bleach differently. Inspect finish and grain closely.
If finish is intact, clean with mild detergent or solvent; strip only when necessary. For unfinished, test oxalic acid for rust or tannin spots, or a weak hydrogen peroxide mix for lightening.
Always spot-test, neutralize chemicals, and sand lightly between steps.
Check the Original Finish Hidden Under Grime
Before you start whitening, inspect the surface to see what finish is hiding under the grime—wax, shellac, varnish, or nothing at all.
You can test small, inconspicuous spots with a solvent like mineral spirits or denatured alcohol to see if the finish softens or lifts.
That quick check tells you whether cleaning, stripping, or bleaching is the right next step.
Inspect Finish Under Grime
When you wipe away the surface grime, take a close look to identify the original finish beneath — shellac, lacquer, varnish, or oil — because knowing what’s under the dirt determines how you clean, strip, or restore the piece without causing damage.
Inspect for sheen, build, and penetration: shellac looks thin and amber, lacquer peels in flakes, varnish forms a thicker film, oil soaks into pores.
Note odors and residue. Photograph areas for reference. Record observations before any intervention.
- Check sheen and texture
- Look for cracking or peeling
- Observe color shifts
- Note residue and scent
Test Finish With Solvent
Although the grime may hide it, you’ll want to verify the original finish with a simple solvent test so you don’t damage the wood by using the wrong cleaner or stripper. Find an inconspicuous spot, dampen a cotton swab with denatured alcohol, acetone, and mineral spirits, and rub each in turn. Note reactions: finish softens, dissolves, or resists. That tells you lacquer, shellac, or varnish. Work slowly and record results.
| Solvent | Reaction |
|---|---|
| Alcohol | |
| Acetone | |
| Mineral spirits | |
| No change | |
| Finish softens |
Which Woods and Finishes Can Be Safely Whitened
Curious which pieces you can safely whiten? You can lighten many unfinished and light-finished woods, but you should check finish type and wood species first.
- Unfinished softwoods — pine, fir: absorb bleach and oxalic solutions well; test a hidden spot.
- Unfinished hardwoods — oak, maple: respond evenly but may raise grain; sand lightly after.
- Shellac and lacquer finishes — thinly applied: can sometimes be softened and lifted; proceed with caution.
- Polyurethane and varnish — intact: resist bleaching; you’ll need to remove finish before whitening.
Always test small areas and avoid delicate antique veneers.
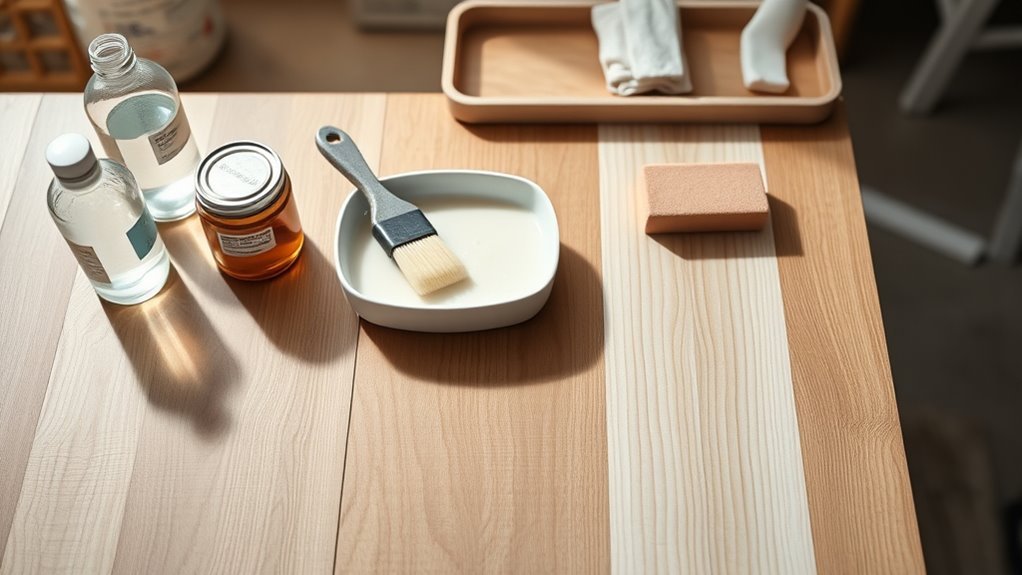
Tools and Household Supplies You’ll Need
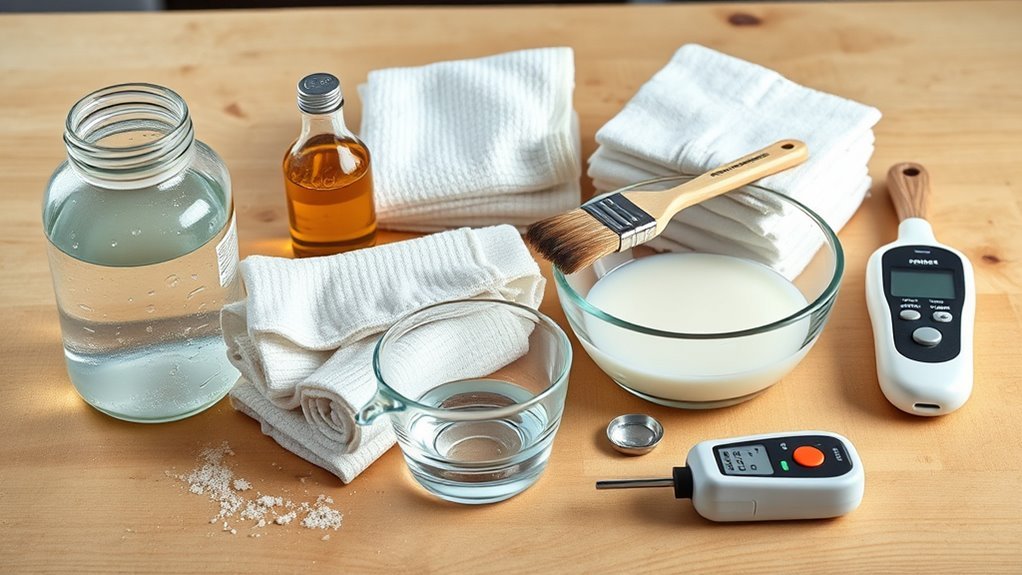
Before you start, gather the right safety gear—gloves, goggles, and a respirator—so you’re protected from fumes and dust.
You’ll also need cleaning and prep supplies like mild detergent, tack cloths, and sandpaper to remove grime and finish.
Finally, assemble whitening chemicals and tools such as oxalic acid or wood bleach, plastic mixing containers, brushes, and rags.
Safety Gear Essentials
Because you’ll be working with chemicals, grit, and dust, gear that protects your skin, eyes, and lungs is essential. You’ll want reliable, well-fitting items to reduce risk and let you focus on the job.
- NIOSH-rated respirator (organic vapor/particulate) for bleach, oxalic acid, and sanding dust.
- Safety goggles that seal to keep splashes and particles out.
- Chemical-resistant gloves (nitrile or neoprene) and long sleeves to prevent skin contact.
- Knee pads and non-slip footwear to protect joints and maintain stability during work.
Inspect gear before use and replace damaged items promptly.
Cleaning & Prep Supplies
When you’re prepping wood for whitening, gather a compact kit of cleaning and prep supplies so you’re not hunting for tools mid-job. Essentials include a stiff-bristle scrub brush, microfiber rags, a plastic putty knife, a sponge, a bucket, and a spray bottle for rinsing.
Add fine steel wool or non-scratch pads for delicate grain, painter’s tape to protect adjoining surfaces, and a vacuum or brush to remove loose dust.
Keep a mild detergent or wood cleaner on hand for degreasing, plus paper towels and a shallow tray for mixing.
Lay down drop cloths to catch runoff and protect flooring.
Whitening Chemicals & Tools
Which products should you reach for to whiten wood safely and effectively? You’ll need a few specific chemicals and tools. Use oxalic acid for removing stains and bleach (oxygen-based) for brightening; avoid concentrated chlorine on delicate woods.
Protect yourself with gloves, goggles, and a respirator. Work with soft brushes and lint-free cloths, and have distilled water for rinsing.
- Oxalic acid crystal or pre-mixed solution
- Oxygen bleach (sodium percarbonate)
- Protective gear (nitrile gloves, eye protection, respirator)
- Soft brushes, foam applicators, lint-free cloths, distilled water
Safety Gear: Gloves, Mask, and Ventilation
Before you start whitening wood, gear up with proper protection: chemical-resistant gloves, a respirator or mask rated for organic vapors and particulates, and good ventilation to keep fumes and dust from building up.
Before whitening wood, wear chemical-resistant gloves, a proper respirator, eye protection, and ensure good ventilation.
You’ll wear nitrile or neoprene gloves to resist bleaches and solvents; change torn gloves immediately.
Choose a respirator with appropriate cartridges or an N95 for sanding dust; fit it snugly.
Use eye protection and long sleeves to avoid splashes.
Keep a fan or open windows to move air but avoid directing fumes toward others.
Dispose of contaminated rags safely and wash exposed skin promptly after finishing.
How to Set Up a Workspace to Protect Floors and Air
Because bleach and solvents can eat finishes and fumes travel fast, set up your workspace so floors, nearby surfaces, and the air stay protected. Clear the area, keep kids and pets out, and plan for ventilation. Follow these steps:
- Lay a chemical-resistant drop cloth or plastic sheeting over floors and furniture; tape edges.
- Work near an open window or use a directional fan to exhaust air outside.
- Seal door gaps with towels or plastic to prevent fumes spreading to other rooms.
- Keep a dedicated trash bag and neutralizer nearby for disposal and spill control.
How to Test a Hidden Spot Before You Start
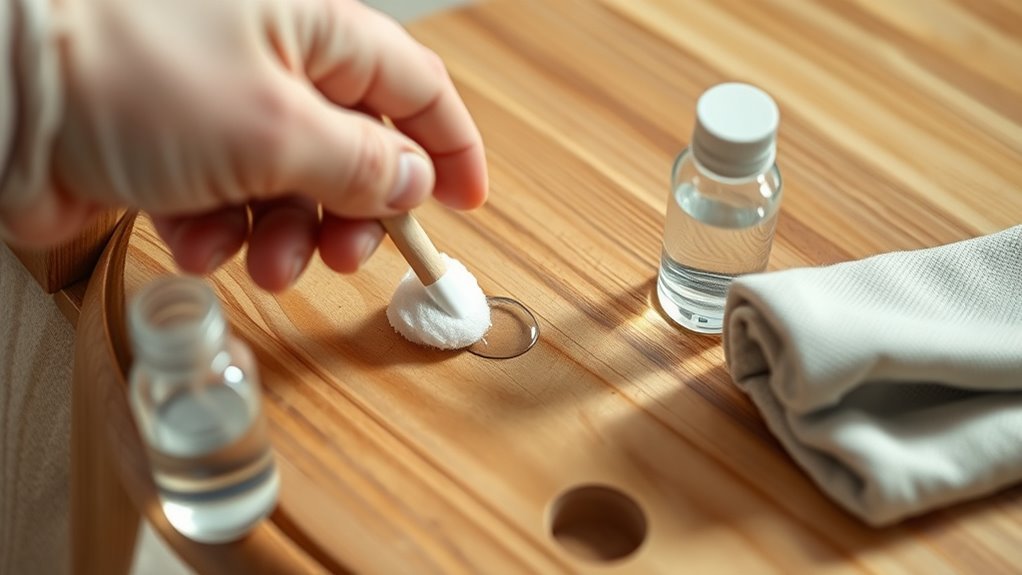
Pick an inconspicuous area like the back of a cabinet or underside of a chair to avoid visible surprises.
Apply a small sample of your whitening method and let it sit according to the product instructions.
Check the spot periodically so you can see the color change slowly and stop when you get the result you want.
Choose An Inconspicuous Area
Where can you test without ruining the look of your piece? Pick a spot nobody sees often: behind a leg, inside a drawer, under a shelf edge or the back panel.
You’ll want an area with the same finish and grain so results match when you proceed. Clean it first so residue won’t skew results. Mark the exact test spot lightly with pencil so you can compare later.
If you’re working on veneered or antique pieces, choose a place where repairs or replacement would be least noticeable.
- Behind legs
- Inside drawers
- Under shelves
- Back panels
Test With Small Sample
How will you know the bleach or cleaner reacts safely? Test a hidden spot first: dab a tiny amount, wait, and check. You’re verifying compatibility, finish preservation, and odor tolerance before committing.
| Step | What to do |
|---|---|
| 1 | Clean area gently |
| 2 | Apply a small drop |
| 3 | Wait 30–60 minutes |
| 4 | Wipe and inspect |
Record results: note any discoloration, finish dulling, or swelling. If it looks unchanged and smells acceptable, proceed cautiously. If damage appears, stop and try a milder product or consult a specialist before treating visible surfaces.
Observe Color Change Slowly
Before you commit to the whole piece, test a hidden spot and watch the color change slowly so you can catch any adverse reaction early. You’ll want to observe over hours and days, not just minutes. Note the initial tone, any darkening, lightening, or blotchiness, and how the wood grain responds.
If it looks good, proceed; if not, try a milder solution.
- Pick an inconspicuous area.
- Apply the whitening method sparingly.
- Photograph at intervals (0, 30, 60, 240 minutes).
- Compare results after 24–72 hours.
Trust what you see before you expand.
Remove Surface Dirt and Grease
Once you’ve cleared loose dust and debris, tackle surface dirt and grease so your whitening treatment can penetrate evenly; greasy residue blocks bleach and makes results blotchy.
Mix mild dish soap with warm water, dampen a soft cloth, and wipe along the grain to lift oils.
For stubborn spots, use a 50/50 mix of isopropyl alcohol and water on a cotton pad, testing an inconspicuous area first.
Rinse with a clean damp cloth to remove residue, then dry thoroughly.
Clean, dry wood accepts whitening solutions evenly, reducing streaks and preserving the wood’s natural texture.
How to Strip Old Wax and Polish Without Damage
Because aged wax and polish can hide grain and repel whitening solutions, you’ll need to remove them gently to avoid damaging the finish underneath. Begin in a well-ventilated space, test a hidden area, and gather soft cloths, mineral spirits, a plastic scraper, and natural bristle brushes.
Work small sections, rubbing with the grain until residue lifts; don’t saturate the wood. After scraping, wipe with mineral spirits and a clean rag, then let the surface dry fully.
If wax persists, repeat once. Finish by lightly buffing with a soft cloth to restore even texture before whitening.
- Test first
- Use gentle tools
- Work with grain
- Dry thoroughly
How Diluted Dish Soap Can Brighten Wood Gently
You can brighten wood gently with a few drops of mild dish soap in a bucket of warm water, which lifts dirt without stripping finish. Use a safe dilution—about one teaspoon per quart—to avoid saturating the grain.
Wring your cloth well and wipe in the direction of the wood to control moisture and protect the surface.
Mild Cleaning Action
While strong chemicals can strip finishes, a simple mix of diluted dish soap and water often brightens wood without harm. You use gentle agitation and soft cloths to lift dirt and old oils, restoring tone without sanding.
Work in small areas, rinse with clean water, and dry promptly to avoid swelling.
- Test an inconspicuous spot first.
- Use a soft microfiber or cotton cloth.
- Rub lightly with the grain, not across it.
- Rinse and dry each section thoroughly.
This mild action refreshes appearance and prepares wood for further whitening steps.
Safe Dilution Ratios
After cleaning a test patch and rinsing the area, it’s time to make a correctly diluted soap solution for gentle brightening.
Mix one teaspoon of mild dish soap with one cup (240 ml) of warm water for routine cleaning—this 1:48 ratio lifts grime without stripping finish.
For tougher dullness, try two teaspoons per cup (1:24), but use it sparingly and shorten contact time.
Always stir gently, not shake, to avoid suds.
Apply with a soft cloth, wipe following grain, then rinse with plain water and dry.
Test small areas first and adjust concentration only if needed.
How Vinegar Solutions Affect Wood Tone
Because vinegar reacts with the tannins and finish in wood, it can subtly lighten or dull tone depending on strength and exposure time. You’ll notice changes fast on softwoods and where finishes are thin. Test a hidden spot first.
Use gentle dilutions for mild brightening; stronger mixes can mute warm hues or raise grain.
- 1:4 vinegar:water — slight brightening, low risk.
- 1:2 — moderate change, may lift tannin stains.
- Straight vinegar — strong effect, can dull finishes.
Rinse and neutralize after treatment to stop continued reaction.
How Oxygen Bleach (Sodium Percarbonate) Works on Stains
When you apply oxygen bleach (sodium percarbonate), it releases peroxide that oxidizes and breaks apart stain molecules. That safe chemical reaction lifts discoloration without harshly damaging wood fibers when used correctly.
You’ll see the fibers brighten as the stains are chemically altered and rinsed away.
Oxidation-Based Stain Removal
If you want to lift organic stains from wood without harsh chemicals, oxygen bleach (sodium percarbonate) is a safe, effective oxidizer that breaks colored molecules apart so they lose their tint. You’ll mix powder with warm water, apply, wait, then rinse.
Work with small areas, test first, and avoid prolonged saturation to protect fibers. Benefits include gentle whitening and minimal odor. Limit use on delicate veneers.
- Mix: follow label ratio for solution strength.
- Apply: use brush or cloth, saturate stain.
- Wait: allow fizzing action, typically 10–30 minutes.
- Rinse: neutralize and dry thoroughly.
Safe Chemical Reaction
How does oxygen bleach actually lift stains from wood? You mix sodium percarbonate with water; it releases hydrogen peroxide and soda ash. The peroxide breaks colored molecules into smaller, less visible pieces without harsh chlorination, and the soda ash helps suspend residues so you can rinse them away. You’ll work gently: no fiber damage if you follow directions and avoid overuse.
| Component | Role |
|---|---|
| Sodium percarbonate | Source |
| Hydrogen peroxide | Oxidizer |
| Soda ash | pH adjuster |
| Water | Activator |
| Rinsing | Removes residues |
Wood Fiber Brightening
Because sodium percarbonate releases hydrogen peroxide and soda ash in water, you’ll see stains fade as the peroxide attacks the chromophores in wood fibers, breaking long dye molecules into smaller, less colored fragments.
While the soda ash raises pH and helps lift residues so they rinse away, you’ll notice color lightening without harsh solvents.
Work gently to avoid raising grain excessively; test a hidden spot first. Follow safety and rinse thoroughly to stop reaction.
- Apply solution evenly.
- Let sit per product instructions.
- Agitate lightly with a soft brush.
- Rinse and neutralize if needed.
Prepare and Apply Oxygen Bleach Safely
Before you mix anything, read the oxygen bleach label and put on gloves and eye protection so you don’t get chemical residue on your skin or in your eyes. Work in a ventilated area and protect nearby surfaces with plastic.
Dissolve the powder in warm water per label ratios; avoid overconcentrating. Test a hidden spot to confirm color change and wood reaction.
Apply with a soft brush or sponge, working along the grain, and keep the wood wet for the recommended time without scrubbing vigorously.
Rinse thoroughly with clean water and let the wood dry completely before evaluating results or applying finish.
When to Use Household Hydrogen Peroxide for Whitening
When you need a quick, mild whitening for lighter stains or for small repairs, household hydrogen peroxide (typically 3–6%) is a good choice—especially on unfinished or lightly finished wood where you don’t want the stronger action of oxalic or commercial bleaches.
Use peroxide when you want controlled, local brightening without stripping finish layers. Test a hidden spot first. Work patiently and avoid over-saturating the wood.
- Small stains or spot repairs
- Lightening aged, yellowed areas
- Pre-refinish touch-ups after sanding
- When gentler than oxalic or commercial bleaches is needed
How to Apply Hydrogen Peroxide for Even Lightening
If you want an even, natural-looking lightening, work in thin, overlapping passes and keep the peroxide just damp—never soaked—so the solution lifts color uniformly without creating blotches.
Start on a small, inconspicuous area to test timing.
Use a soft brush or lint-free cloth to apply 3% or 12% peroxide, moving steadily with the grain.
Let it sit until you reach the desired shade, checking frequently.
Blot excess with a clean cloth; don’t rinse unless instructed.
Neutralize by wiping with a damp cloth, then dry thoroughly.
Sand lightly between coats for smooth, consistent results.
Use Oxalic Acid to Remove Water and Rust Stains From Wood
Although it sounds harsh, oxalic acid is one of the safest and most effective products for lifting water rings and rust stains from wood when you follow the directions and protect yourself.
You’ll see stains fade without aggressive sanding. Work in a ventilated area, wear gloves and eye protection, and test a hidden spot first.
Apply a prepared solution, let it sit briefly, then rinse and dry thoroughly.
Neutralization and disposal deserve separate careful steps.
- Test a small area
- Protect yourself and surroundings
- Apply, wait, rinse
- Dry completely before finishing
How to Mix and Neutralize Oxalic Acid Safely
Because oxalic acid is a concentrated chemical, you’ll always measure and dilute it precisely: dissolve the recommended amount (usually a few ounces per gallon) in cool water, mix slowly to avoid splashing, and stir until fully clear.
Wear gloves, eye protection, and a respirator if ventilation is poor.
Test on scrap wood first.
Apply with a brush, wait per instructions, then rinse thoroughly with clean water.
To neutralize any residue, wipe the surface with a solution of baking soda (one tablespoon per quart of water), rinse again, and dry.
Dispose of leftover solution per local hazardous-waste guidelines.
When to Use Chlorine Bleach and When to Avoid It
You can use chlorine bleach when you need fast, strong stain removal on unfinished, durable woods because it breaks down organic discoloration quickly.
Avoid it on delicate, antique, or water-sensitive pieces and on any wood with glued joints, since bleach can weaken fibers and ruin finishes or adhesives.
Always test a hidden spot first and neutralize thoroughly if you go ahead.
Chlorine Bleach Pros
When should you reach for chlorine bleach to brighten wood, and when should you skip it? You’ll choose chlorine bleach when you need fast stain removal, mold/mildew killing, or quick surface lightening on unfinished, sturdy woods. It works well for:
- Fast removal of organic stains (coffee, tea, mildew).
- Treating outdoor or utility wood that tolerates harsh chemicals.
- Brightening heavily discolored, unfinished planks before refinishing.
- Situations needing low-cost, readily available treatment.
You’ll still wear gloves, ventilate, and test a hidden spot—chlorine is powerful, so use it where strength outweighs risk.
When To Avoid
If a wood piece is delicate, finished, or shows water stains or tannin bleed, skip chlorine bleach—its harshness can strip finishes, raise grain, and set chemical stains that are hard to reverse.
Don’t use chlorine on antique, veneer, or glued joints where solvents can dissolve adhesives or lift thin layers. Avoid painted or sealed surfaces unless you plan to refinish; bleach won’t penetrate evenly and can leave mottled results.
Steer clear when pets, children, or poor ventilation are present—fumes and residue are hazardous. Choose oxalic acid or hydrogen peroxide for sensitive situations, or test a discreet area first.
How to Use Chlorine Bleach Without Harming Wood
Although chlorine bleach can effectively lighten stains, you’ll need to handle it carefully to avoid damaging the wood’s fibers or finish. Work in a ventilated area and test a hidden spot first. Protect surrounding finishes and wear gloves and eye protection.
Use diluted chlorine bleach cautiously—ventilate, test a hidden spot, protect finishes, and wear gloves and eye protection.
- Dilute: mix one part household bleach with four parts water to reduce strength.
- Apply: brush on gently; don’t soak. Work in small sections.
- Rinse: neutralize with plenty of water, then blot dry to avoid grain raising.
- Sand lightly after fully dry if needed, then refinish promptly to seal the surface.
How to Remove Tannin Bleed and Iron Stains From Wood
Bleach can help with surface lightening, but tannin bleeds and iron stains need different treatment because they come from within the wood and react chemically. You’ll neutralize tannins with oxalic acid powder dissolved in warm water; apply, wait until stains fade, then rinse. For iron stains from nails or metal, use oxalic acid too or a commercial rust remover formulated for wood. Sand lightly if fibers raise, then neutralize and dry fully. Seal with a penetrating oil or clear finish.
| Problem | Solution |
|---|---|
| Tannin bleed | Oxalic acid soak |
| Iron stain | Rust remover |
| Aftercare | Rinse, dry, seal |
How to Lighten Built-In Staining From Sunlight and Age
When sunlight and age have mellowed your wood’s color, you can gently reverse built-in staining by removing surface oxidization and any photo‑degraded finish before treating the bare wood. You’ll work in stages: clean, strip degraded finish, lightly sand, then brighten the grain.
Use oxalic acid for tannin-rich woods or a gentle wood bleach for general lightening. Test a hidden spot first.
- Clean surface with mild detergent and dry thoroughly.
- Strip degraded finish with a suitable remover; avoid harsh abrasion.
- Sand lightly with fine grit, following grain direction.
- Apply oxalic solution or commercial wood brightener, rinse and neutralize.
How to Deal With Yellowed Varnish or Shellac
If the wood itself looks right after brightening but the finish still casts a yellow haze, you’ll need to address varnish or shellac that has aged or oxidized.
Test a hidden spot with denatured alcohol: shellac softens and dissolves, varnish won’t. For shellac, wipe gently with alcohol-soaked cloths until the haze lifts, then neutralize with a damp cloth.
For aged varnish, use fine abrasive pads and a mild solvent cleaner to reduce surface yellowing without stripping color. After treatment, rinse and let dry fully.
Refinish only if needed using a non-yellowing topcoat to maintain the brightened look.
Remove Old Finish for Deeper Whitening
Before you whiten, check what finish is on the wood—varnish, shellac, lacquer, or paint—so you know how stubborn it will be.
Pick a stripper that’s compatible with that finish and safe for the wood, and test it in an inconspicuous spot.
Prepare the work area with ventilation, drop cloths, and proper PPE so you can strip efficiently and safely.
Assess Existing Finish
Although the surface might look fine at a glance, you need to identify the existing finish to know whether stripping is necessary for deeper whitening. Inspect visually and by touch: glossy, satin, or worn? Test solvent on a hidden spot to see if finish softens. Check for stain penetration versus surface coating; wood that’s deeply stained may need more than surface treatment. Note any repairs, fillers, or veneers that affect methods.
- Look for sheen level and wear patterns.
- Rub hidden area with solvent to test removal.
- Probe edges for veneer or thin coatings.
- Document findings before proceeding.
Select Appropriate Stripper
Once you’ve identified the existing finish, choose a stripper matched to the coating and to your safety needs so you’ll remove old finish effectively without harming the wood.
Pick a chemical stripper suited to lacquer, shellac, varnish, or polyurethane—label guidance matters. For indoor jobs or delicate veneers, favor low-odor, water-based or soy-based formulas and test a small area.
For heavy buildups, use a caustic or methylene chloride product only with full PPE and ventilation. Consider a gel for vertical surfaces to reduce runoff.
Dispose of removed finish and rags per local rules. Match product strength to finish to avoid over-stripping.
Prepare For Stripping
Now that you’ve picked the right stripper, get the workspace and wood ready so the product can work effectively and safely. Clear the area, ventilate well, and wear gloves, goggles, and a respirator. Test in an inconspicuous spot to confirm the stripper won’t harm the wood.
- Remove hardware and tape surrounding surfaces.
- Lay drop cloths and raise the piece on blocks for access.
- Use a scraper gently to lift softened finish, wiping residue with rags.
- Rinse or neutralize per product instructions, then let the wood dry fully before bleaching.
Prepare methodically to ensure even, deeper whitening results.
How to Sand Wood for Uniform Whitening Results
Before you apply any whitening treatment, sand the wood evenly so the bleach soaks in uniformly; inconsistent sanding will leave blotchy, patchy results.
Sand wood evenly before whitening so bleach soaks uniformly — uneven sanding causes blotchy, patchy results.
Start with a coarser grit (80–100) only to remove finish or deep scratches, then progress to 120, finishing with 150–180 for most species.
Sand with the grain, keep even pressure, and overlap strokes to avoid ridges.
Use a sanding block or orbital sander for flat areas and hand-sanding for contours.
Vacuum and tack-cloth between grits to remove dust.
Inspect under raking light; any uneven areas should be re-sanded before applying the whitening agent.
How Grain Raising Affects Whitening and How to Prevent It
When you bleach wood, the raised grain can change the texture and make the finish look uneven. You can prevent this by sanding carefully with the grain and following up with a finer grit to smooth the fibers.
For best results, seal the surface before whitening so the bleach penetrates evenly and the grain stays flat.
Grain Texture Changes
Although whitening opens wood’s pores to lighten color, it also raises the grain, leaving a rougher texture that can trap bleach or oxalic residue and create uneven tone. You’ll notice raised fibers after wet treatments; they scatter light differently and feel coarse.
To control texture changes, act promptly and gently, neutralize residues, and avoid prolonged wetting. Restore uniform appearance by aligning treatments with the wood’s response. Consider these steps:
- Rinse thoroughly after chemical whitening.
- Blot excess moisture, don’t rub aggressively.
- Apply a mild conditioner to calm fibers.
- Let the wood dry fully before finishing.
Sanding To Prevent
Because wet whitening lifts fibers and can leave the surface rough, you’ll need to sand carefully to knock down raised grain before finishing. Start with fine grit—180 to 220—so you remove fuzzy fibers without gouging.
Sand along the grain, not across, and use a sanding block or orbital sander for even pressure. After sanding, vacuum and wipe with a tack cloth to remove dust that can interfere with whitening.
If the grain still looks raised after a test wipe, repeat with a slightly finer grit. Proper sanding guarantees the bleach or whitening solution penetrates uniformly and yields a smooth, consistent result.
Sealing Before Whitening
If you seal the wood before whitening, you can control how much moisture the bleaching solution raises the grain and avoid uneven texture. Sealers block excessive absorption so the bleach acts evenly; they also reduce sanding afterward.
Use a thin, even coat, let it cure, then apply your whitening agent. If grain still lifts, sand lightly with fine grit and re-seal.
- Choose a reversible, low-build sealer.
- Apply thin coats; cure per instructions.
- Test on scrap to check whitening response.
- After whitening, sand very lightly and finish with a protective topcoat.
How to Use Wood Bleach in Multiple Stages for Strong Stains
When a single bleaching pass won’t lift deep or dark stains, you’ll need to work in stages: apply the bleach, neutralize and rinse, then repeat until the wood reaches the desired tone.
Begin with a light application of two-part or oxalic bleach, following product directions and wearing protection. Let it act, then neutralize thoroughly with the recommended neutralizer or a vinegar solution, rinse, and dry completely.
Inspect the grain and color; if stains persist, repeat the cycle, using slightly longer dwell times but avoiding over-bleaching.
Between stages, sand lightly to remove raised grain and guarantee even uptake for the next pass.
How to Blend Bleached Patches Into Surrounding Wood
After repeated bleaching cycles you’ll often notice lighter patches or uneven tones where the solution took more strongly; you’ll want to blend those areas so the repair reads as part of the whole board. Start by feathering edges with fine sandpaper to remove stark lines and expose consistent grain.
Use a diluted dye or tinted wood stain to gently bring tone into the pale spot, applying in thin layers and wiping excess. Seal and reassess between coats.
If needed, lightly scuff adjacent wood to match sheen. Protect final result with a clear topcoat that evens reflectivity.
- Sand edges
- Tint gradually
- Reassess coats
- Seal final
How to Fix Blotchy or Uneven Lightening
Because wood soaks bleach unevenly, you’ll often end up with blotchy or streaked lightening that looks like surface damage rather than a uniform fade. First, neutralize and dry the area. Lightly sand with fine grit to smooth edges between tones.
Apply a very diluted bleach or oxalic acid paste on isolated dark spots, then rinse and dry; test on scrap. If blotches persist, use a wood toner or pigment wash to even color—thin coats build control.
Finish with a clear sealer to lock tone. Work slowly, matching grain direction, and stop when the *gradation* looks natural.
How to Treat Reclaimed or Water-Damaged Wood
Before you try whitening reclaimed or water-damaged wood, assess the boards carefully for rot, warping, and embedded contaminants.
You’ll want to stabilize compromised areas—replace or reinforce soft sections—and clean the surface with a suitable detergent or wood cleaner to remove dirt, mold, and salts.
Once it’s dry and structurally sound, you can move on to lightening treatments.
Assess Wood Condition
When you’re working with reclaimed or water-damaged wood, start by inspecting it closely for rot, mold, stains, deep cracks, and structural weakness so you can decide whether cleaning, stabilization, or replacement is needed.
Assess moisture with a meter, tapping to hear hollow spots. Smell for mildew; visible mycelium needs attention. Probe soft areas with a screwdriver to map rot extent. Check joinery and fasteners for corrosion and movement.
Note severe discoloration that might resist whitening. Record findings and decide whether the piece is worth restoring or safer to replace before any whitening or finishing steps.
- Use moisture meter
- Tap and probe
- Inspect joins/fasteners
- Note discoloration
Stabilize And Clean
Now that you’ve inspected the wood and noted moisture, rot, and staining, stabilize any soft or loose areas and remove surface contaminants so whitening and repairs will hold.
Start by drying the wood thoroughly—use fans, dehumidifiers, or sunlight for gentle airing. Cut away irreparably rotten sections, and consolidate fragile fibers with a wood hardener following the product instructions.
Clean surfaces with a mild detergent or oxygen-based cleaner to lift dirt and mildew; rinse and let dry.
Sand lightly to remove surface corrosion or finish, then vacuum and wipe with solvent.
Only then apply bleach or oxalic treatments for whitening.
How to Whiten Oak, Maple, Pine, and Walnut Differently
Because each species soaks up bleach and stain differently, you’ll need tailored whitening techniques for oak, maple, pine, and walnut to get even, predictable results. Adjust prep, bleaching strength, and neutralizing to match grain density and tannin content.
- Oak: Sand open-grain first; use oxalic acid to remove tannin stains, then mild peroxide for even lift.
- Maple: Light sanding; avoid strong oxidizers—use diluted peroxide and short exposure to prevent blotching.
- Pine: Strip resin, sand thoroughly; test peroxide+water mix—pine can lighten fast and unevenly.
- Walnut: Use gentle, longer low-strength peroxide treatments; test small areas to preserve rich tone.
How to Care for Painted or Faux-Finish Pieces Before Whitening
Want to keep painted or faux-finish pieces safe while whitening the wood beneath? First, test a hidden area to see if paint or glaze resists your bleaching method. Clean gently with mild soap, rinse, and dry. Mask edges with painter’s tape and cover decorative surfaces with plastic sheeting. If paint flakes, stabilize with a conservation-grade adhesive before proceeding. Avoid sanding through decorative layers. Plan to remove coverings only after the wood’s fully dry. Use this quick reference table for protection priorities:
| Item | Action | When |
|---|---|---|
| Painted surface | Test & tape | Before whitening |
| Glaze | Stabilize | If loose |
| Edges | Cover | During process |
How to Protect Hardware and Metal Parts During Whitening
Before you start whitening, remove any removable knobs, hinges, or plates and keep them in a labeled container so you don’t lose parts.
For fixed hardware, cover it tightly with painter’s tape and plastic to prevent bleach or oxalic acid from contacting the metal.
After whitening, neutralize any chemical residue on nearby metal with a mild baking soda solution and dry thoroughly to stop corrosion.
Remove And Cover Hardware
When you’re ready to whiten wood, take time to remove or carefully cover all hardware so screws, hinges, and metal trim don’t get stained or corroded.
Unscrew removable pieces and store them in labeled bags to avoid mix-ups.
For fixed hardware, tape and wrap thoroughly with plastic and painter’s tape, sealing edges.
Use rubber bands or masking film on knobs and handles.
Keep solvent-soaked rags away from metal to prevent spotting.
After whitening, inspect each piece before reinstallation, polishing or replacing corroded items as needed to guarantee a clean, professional finish.
- Remove and label
- Bag small parts
- Tape and wrap fixed pieces
- Inspect before reinstalling
Neutralize Chemical Residue
After removing or covering hardware, you’ll need to neutralize any lingering bleach or chemical residue to keep metal from corroding or staining. Rinse the wood thoroughly with clean water to remove surface chemicals.
Then apply a baking soda solution (1 tablespoon baking soda per cup water) to neutralize bleach. Wipe or sponge gently, then rinse again.
For stubborn residue, use white vinegar diluted half-and-half with water, but rinse well afterward to avoid acid exposure.
Dry completely before reattaching hardware.
If hardware was left in place, inspect for discoloration, clean metal with a mild metal cleaner, and apply protective wax or oil.
Drying Time and Speeding Cure After Bleaching
Since bleaching removes moisture and alters the wood’s chemistry, you’ll need to allow adequate drying time before sanding or finishing. Plan for 24–72 hours for thin pieces, several days for thicker boards, and longer in cool or humid conditions.
Since bleaching removes moisture and alters wood, allow adequate drying—24–72 hours for thin pieces, longer for thick or humid conditions
To speed curing safely, follow these steps:
- Increase airflow with fans and open windows to lower humidity.
- Use a dehumidifier in the room to remove moisture faster.
- Place boards upright to expose more surface area to air.
- Avoid heat sources that could crack or warp the wood; gentle warmth (not direct heat) helps.
Check dryness with a moisture meter before proceeding.
How to Neutralize Chemical Residues Before Finishing
Because bleaching agents can leave alkaline or oxidizing residues that interfere with stains and finishes, you’ll need to neutralize and rinse the wood before sanding or sealing.
Test pH with strips; ideal is near neutral.
For peroxide and oxalic acid, rinse thoroughly with clean water and let dry fully.
For chlorine bleach, apply a diluted vinegar solution (1:1 with water) to neutralize, then rinse.
For sodium hydroxalkide-based bleaches, use a weak citric acid rinse, then rinse again.
Wear gloves and eye protection, work in ventilation, and allow complete drying time before proceeding to sanding or applying any finish.
How to Choose a Finish That Preserves a Bright Look
Now that you’ve neutralized residues and fully dried the wood, pick a finish that locks in the lightened tone without yellowing or darkening over time. You want clarity, UV protection, and compatibility with previous treatments.
Consider these points when choosing:
- Use non-yellowing clear coats labeled “UV-stable” or “lightfast” to slow discoloration.
- Prefer finishes with low ambering—test on a scrap to confirm long-term look.
- Choose breathable options for porous woods to avoid trapped moisture and cloudiness.
- Match sheen to aesthetics (matte keeps subtlety; satin/pearl adds slight depth) and guarantee product is suitable for interior use.
How to Apply Oil Finishes Versus Water-Based Clear Coats
When you’re choosing between oil finishes and water-based clear coats, remember oils penetrate the grain while water-based products sit on the surface.
Oils often deepen color and need periodic reapplication, whereas water-based finishes keep a brighter look and usually resist scratches and yellowing better.
Think about how much maintenance you want and whether you prefer a saturated or true-to-wood appearance.
Oil Penetration vs Surface
If you want a finish that soaks into the wood and highlights grain, choose an oil; if you prefer a film that sits on the surface for easier cleaning and greater abrasion resistance, pick a water‑based clear coat. You’ll feel and see the difference: oils penetrate pores, warm tones, and enhance grain contrast, while water‑based coatings form a protective layer, keeping whitened surfaces uniform. Match application to look: oils rub or wipe in; water‑based sprays or brushes on. Consider drying time, recoat windows, and sanding between coats for best clarity.
- Grain enhancement with oil
- Surface film with water‑based
- Application methods differ
- Finish appearance choice
Durability And Maintenance
Having chosen between an oil that soaks in and a water‑based film that sits on top, you’ll want to evaluate how each finish performs over time and how to care for it. You’ll prefer oil if you want easier local repairs and richer aging; oils need periodic reapplication and buffing. Choose water‑based for tougher surface resistance and simple cleaning; scratches require refinishing the topcoat. Both benefit from gentle cleaners and avoid harsh chemicals or prolonged sunlight. Match maintenance to use: high traffic gets water‑based, decorative pieces suit oil.
| Finish | Maintenance |
|---|---|
| Oil | Reapply, buff |
| Water‑based | Clean, recoating |
| Both | Gentle cleaner |
How Wax, Shellac, and Lacquer Affect Whitened Wood Tone
Although each finish shares the job of protecting wood, wax, shellac, and lacquer change a whitened wood’s tone in distinct ways you’ll want to contemplate. You’ll notice warmth, sheen, and depth vary by product and application, so pick based on desired look and use.
- Wax: Adds soft warmth and low sheen; preserves a matte, slightly ambered white.
- Shellac: Gives a warm, amber glow; builds depth but can yellow faster over time.
- Lacquer: Dries clear and bright; maintains cooler whites with higher sheen options.
- Combination: Layering can balance protection and tone—test first on scrap.
How to Maintain Whitened Wood With Regular Cleaning
When you clean whitened wood regularly, you’ll preserve its bright, even tone and prevent grime from dulling the finish. Wipe dust with a soft microfiber, follow grain direction, and use a damp cloth with mild soap for spots. Dry immediately to avoid water marks. Test cleaners in an inconspicuous spot first. Avoid abrasive pads or harsh solvents that strip whitewash.
| Task | Frequency |
|---|---|
| Dusting | Weekly |
| Spot cleaning | As needed |
| Deep gentle wash | Monthly |
| Protective wipe (oil-free) | Quarterly |
Stick to gentle methods and simple schedules to keep whitened wood looking fresh.
How to Touch Up Scratches and Wear on Whitened Pieces
If a scratch or worn spot mars your whitened wood, you can often blend it back into the finish without refinishing the whole piece. Assess the damage, clean the area, and choose touch-up products that match the whitewash tone. Work carefully and test first.
If a scratch mars your whitewashed wood, gently clean, test a matching touch-up, and blend carefully.
- Sand lightly with fine grit to remove rough edges.
- Apply a matching diluted whitewash or tinted wood stain sparingly.
- Feather edges with a damp cloth to blend; let dry thoroughly.
- Seal with a thin coat of clear matte finish to protect and harmonize sheen.
Recheck color after curing and repeat minimally if needed.
How to Prevent Future Yellowing From Sunlight and Smoke
Because sunlight and smoke both break down wood finishes and amber their pigments over time, you’ll want to limit exposure and choose protective products now to keep whitened wood looking fresh. Position pieces away from direct sun; use UV-filtering window film, curtains, or blinds.
Avoid smoking near wood and ventilate cooking areas to cut airborne oils. Refinish with a clear, non-yellowing topcoat labeled UV-resistant or water-based polyurethane; reapply per manufacturer intervals.
Use washable covers on high-use items and rotate displays so sunlight ages surfaces evenly. Inspect periodically and touch up finish before significant discoloration sets in.
How to Estimate Time and Cost for Your Whitening Project
How long will it take and what’ll it cost to whiten your wood depends on the size of the piece, the method you choose, and the condition of the finish and substrate. Estimate time by breaking the job into prep, chemical or sanding work, neutralizing, and drying. Cost adds cleaners, bleach or oxalic acid, sandpaper, gloves, and sealant.
Whitening wood time and cost vary by size, method, and finish—estimate prep, cleaning or sanding, neutralizing, drying, and supplies.
- Prep & assessment: 15–60 min for small pieces, longer for large or damaged items.
- Materials: $10–$60 for DIY supplies.
- Labor: 1–8 hours depending on method and layers.
- Contingency: add 10–25% for unexpected repairs.
How to Determine When to Call a Professional Restorer
When the project is bigger than a weekend afternoon or the wood shows structural damage, call a professional restorer—you’re saving time and preventing costly mistakes by getting expert assessment, tools, and techniques that most DIYers don’t have.
If stains are deep, finishes failed repeatedly, or the piece is antique or valuable, don’t risk DIY fixes that can reduce value. Call a pro when you lack safe access, power tools, or experience with tricky finishes and joinery.
Get quotes, ask about references and insurance, and confirm methods they’ll use. Hire someone when the cost of error outweighs the savings.
How to Safely Dispose of Bleaching Chemicals and Rags
If you’ve used bleach, oxalic acid, or other wood brighteners, don’t just toss leftover solutions or saturated rags in the trash—these chemicals can harm people and the environment and may react dangerously with other waste.
Neutralize small amounts per product instructions, dilute with plenty of water, and never mix different chemicals.
Bag soaked rags in a metal container with a tight lid and allow them to dry outdoors away from heat sources before disposal or recycling per local rules.
Contact your municipal hazardous waste facility for larger quantities.
Follow label directions and local regulations to protect yourself and your community.
- Neutralize solutions
- Contain rags
- Use hazardous waste services
- Follow labels
Document Before-And-After Progress for Resale
Because buyers want proof of care and value, document each step of your whitening project with clear, dated photos and brief notes. Photograph the original condition, each major treatment stage, and the finished piece from consistent angles and lighting.
Note dates, products, concentrations, application times, and any sanding grits used so buyers know what was done. Store images and notes in a simple folder or cloud album labeled for the item; export a PDF summary to include with listings or repair history.
Honest, organized documentation boosts buyer confidence, supports pricing, and can speed resale without hiding prior issues.
Quick Fixes for Common Whitening Problems
Although whitening mistakes are frustrating, you can fix most common issues quickly with the right approach. Assess the problem, test solutions on an inconspicuous spot, and proceed calmly. Use a soft cloth, gentle cleaners, and fine sanding where needed. Follow with proper neutralizing and drying.
- Sanding: Lightly sand with fine grit to remove uneven whitening.
- Neutralize: Rinse oxalic or bleach residues with a vinegar solution, then dry.
- Reapply: Apply a thin, even whitening coat or diluted solution if patchy.
- Blend & Seal: Feather edges, let cure, then seal to protect and match finish.
Frequently Asked Questions
Will Whitening Weaken the Structural Integrity of Old or Antique Wood?
Mostly no — whitening usually won’t weaken old or antique wood if you use gentle oxalic acid or hydrogen peroxide properly and avoid over-saturating. You’ll still want to test a hidden spot and seal the wood afterward to be safe.
Can Pets Safely Be Around Whitened Wood Before Finishes Fully Cure?
No, you shouldn’t let pets near whitened wood until finishes fully cure; fumes and sticky surfaces can harm them. Keep pets away, ventilate the area well, and follow finish manufacturer’s cure-time recommendations closely.
How Will Whitening Affect Glued Joints or Veneer Adhesion?
Whitening can loosen hide or animal-glue joints and lift veneer if over-saturated; you’ll avoid problems by testing, using mild solutions, limiting soak time, clamping glued areas, and thoroughly neutralizing and drying before re-gluing or finishing surfaces.
Are There Eco-Friendly Disposal Options for Used Bleach Solutions?
Yes — you can neutralize and dispose safely: dilute leftover bleach heavily, add sodium thiosulfate to neutralize, test pH, then pour slowly down a drain with lots of water or take to a hazardous-waste facility if regulations require.
Can Whitening Change the Compatibility With Future Stains or Paints?
Yes — whitening can alter wood’s porosity and color, so you might find stains or paints adhere or look different; you’ll need to sand, use a primer or test samples to guarantee compatible finish and color results.
Conclusion
You’ve got safe, practical options for brightening wood yourself, from light cleaning to full bleaching, and you’ll know when to stop and call a pro. Always test a hidden spot first, match your method to the finish and wood type, and handle chemicals and rags responsibly. Take before-and-after photos for resale, and use quick fixes for small issues. With care and the right approach, you’ll restore wood’s natural beauty without costly mistakes.