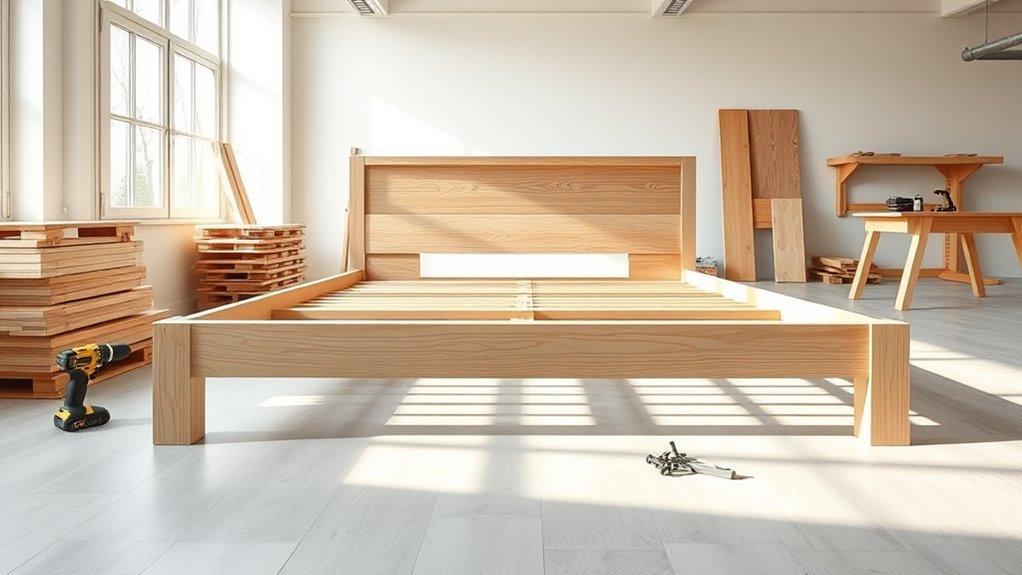
You can build a sturdy king bed frame in a weekend by measuring your room and mattress, choosing a platform, storage, or slatted design, and buying quality lumber, fasteners, and a few power tools. Cut rails, slats, and a center support per a precise cut list, pre-drill and test-fit, then assemble with glue, screws, and brackets; add headboard and finish. Follow safe shop practices and a step‑by‑step plan below to get full details.
Who This Guide Is For : King Bed Frame Overview
If you’re planning to build a king-size bed frame—whether you’re an experienced woodworker wanting a custom design or a handy beginner tackling your first full-size project—this guide walks you through the essentials: measurements, materials, tools, and step-by-step assembly.
You’ll find clear guidance for standard king dimensions, optional platform or slatted support, and material choices like pine, oak, or plywood. Safety, load capacity, and hardware selection get prioritized so your frame’s sturdy and long-lasting.
You’ll get tips for adapting plans to mattress thickness, room layout, and skill level, plus when to seek professional help.
Quick Build Summary: Steps And Timeline
You’ll need a concise list of tools and materials up front so you can work without interruptions.
Then follow a step-by-step timeline that breaks the build into prep, assembly, and finishing stages with estimated times for each.
I’ll also point out practical time-saving tips to keep the project efficient and on schedule.
Tools And Materials
Start by gathering the essential tools and materials so you can work efficiently and avoid mid-build trips to the hardware store. You’ll need lumber: 2x10s or 2x12s for rails, 1x4s for slats, and plywood for the platform.
Grab wood screws, pocket-hole screws, wood glue, and brackets. For tools, have a circular saw or miter saw, drill/driver, pocket-hole jig, sander, tape measure, square, clamps, and a level.
Finish supplies: primer, paint or stain, brushes or a sprayer, and protective clear coat.
Don’t forget safety gear: glasses, ear protection, and dust mask.
Step-By-Step Timeline
Once you have your tools and materials staged, follow this concise timeline to build the king-size frame in logical steps that keep the project moving efficiently. Start by cutting and prepping all lumber, then assemble the outer rails and headboard for fit. Next, join the side rails to the head and foot boards, secure with bolts, and check squareness.
Install center supports and slats, then sand and finish fasteners. Finally, attach any decorative trim and place the mattress to verify stability.
- Day 1: Measure, mark, and cut parts.
- Day 2: Dry-fit and assemble main frame.
- Day 3: Install center supports and slats.
- Day 4: Sand, finish, and final assembly.
Time-Saving Tips
If you want to finish the king-size frame faster without cutting corners on strength, focus on prep, sequencing, and simple shortcuts. Measure twice, cut once: mark all pieces before you touch the saw. Pre-drill and label parts so assembly flows without pauses. Use pocket-hole jigs and clamps to speed strong joinery.
Assemble the headboard and footboard flat on sawhorses while one person cuts rails and slats. Batch-sand and finish components before final assembly to avoid rework. Keep common fasteners and tools within reach.
Work in stages across two days to maintain momentum and avoid rush errors.
King Mattress Sizes And Clearance Needs
Want to know which king mattress fits your room and how much space you’ll need around it? You’ll choose between standard (76″×80″), California (72″×84″), and specialty sizes; pick the one that matches sleeping habits and doorway access.
Factor mattress depth when planning a platform or headboard. Always leave clearance for movement, cleaning, and drawers.
- Minimum clearance: 24″ at walkways for comfortable passage
- Allow 30–36″ clearance for dressers and seating areas
- Add 2–6″ around platform for bedding tuck and ventilation
- Consider door swings and appliance paths when sizing frame
Measure Your Bedroom And Place The Frame
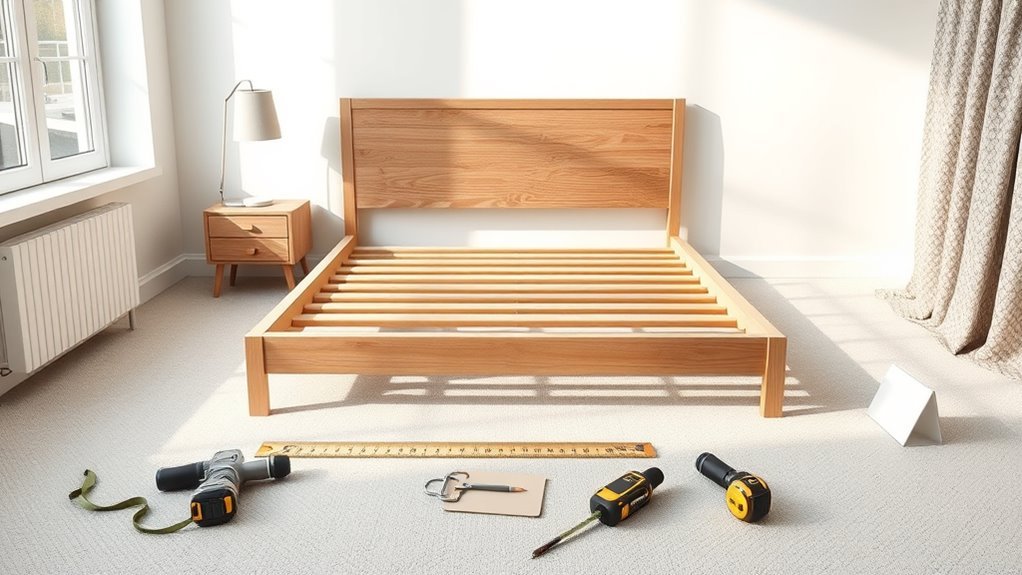
Now that you’ve picked a mattress size and accounted for clearance, measure your room to confirm the king frame will fit with comfortable circulation and furniture placement. Use a tape measure to record wall-to-wall length and width, note door swing, window locations, radiators, and vents.
Sketch a floor plan to scale or use masking tape on the floor to outline the frame and nightstands.
Check walking paths: aim for at least 24 inches along sides and 30 inches at foot for easy access.
Consider doorways and stair turns for bringing assembled pieces inside.
Adjust placement to balance function and sightlines.
Set A Realistic Budget For A King Bed Build
Before you cut any wood, figure out material cost estimates so you know what lumber, fasteners, and finishes will run you.
Don’t forget to factor labor and time costs—either your own hours or hired help—into the total.
With clear numbers for materials and work, you can set a realistic budget and avoid surprises.
Material Cost Estimates
When you plan a king bed build, estimate materials first so you don’t get surprised by costs mid-project. You’ll tally lumber, fasteners, finish, and hardware, comparing quality tiers. Get local lumber prices, factor waste (usually 10–15%), and note specialty parts like slats or center supports.
Buy slightly better wood if appearance matters; you’ll save refinishing time.
- Rough-sawn vs. kiln-dried lumber: price and stability differences
- Screws, bolts, brackets: count and cost per pack
- Finish: stain/paint and sealer choices affect price
- Mattress support components: slats, plywood, or platform systems
Labor And Time Costs
After you’ve totaled materials, plan the labor and time so your budget reflects real effort, not just parts. Estimate hours for cutting, assembly, sanding, finishing, and hardware installation.
If you’re new, add 25–50% contingency; experienced builders can use tighter estimates. Decide whether you’ll work solo or hire help — labor rates vary: friends are cheaper than pros.
Factor setup, cleanup, and drying times for stains or glue. Multiply hourly rates by estimated hours and include a small buffer for mistakes or extra trips.
Record actual time as you go to refine future projects and budgets.
Choose A Bed Style: Platform, Sleigh, Or Storage
Although you can build almost any design, picking a bed style now shapes the frame’s proportions, joinery, and storage options, so decide whether you want the low-profile simplicity of a platform, the sweeping curves of a sleigh, or the practical drawers and lift mechanisms of a storage bed.
You’ll balance aesthetics, construction complexity, and function: platforms need sturdy slats and straightforward joinery; sleighs demand bent or laminated curves and careful symmetry; storage beds add box frames, drawer slides, or gas lifts and reinforce the center support.
Consider mattress ventilation, floor clearance, and workshop skill before choosing.
- Platform: simple, minimal hardware
- Sleigh: curved components, precise shaping
- Storage: drawers, lift systems, reinforced base
- Hybrid: raised platform with integrated storage
Design The Headboard And Attachment Options
Your choice of bed style will influence the headboard’s scale and how you attach it, so plan the headboard early to keep proportions and joinery consistent. Decide height, material, and whether it’s fixed, wall-mounted, or removable. Sketch mounting points aligned with the frame’s center supports. Use bolts into a ledger or cleats for solid connections, or use French cleats for easy removal. Consider upholstery thickness and wiring for lights. Test fit before finishing.
| Style | Attachment | Note |
|---|---|---|
| Panel | Bolted | Strong, permanent |
| Upholstered | Cleat | Removable, padded |
| Slatted | Bracket | Lightweight, airy |
Decide On Under‑Bed Storage Or Drawers
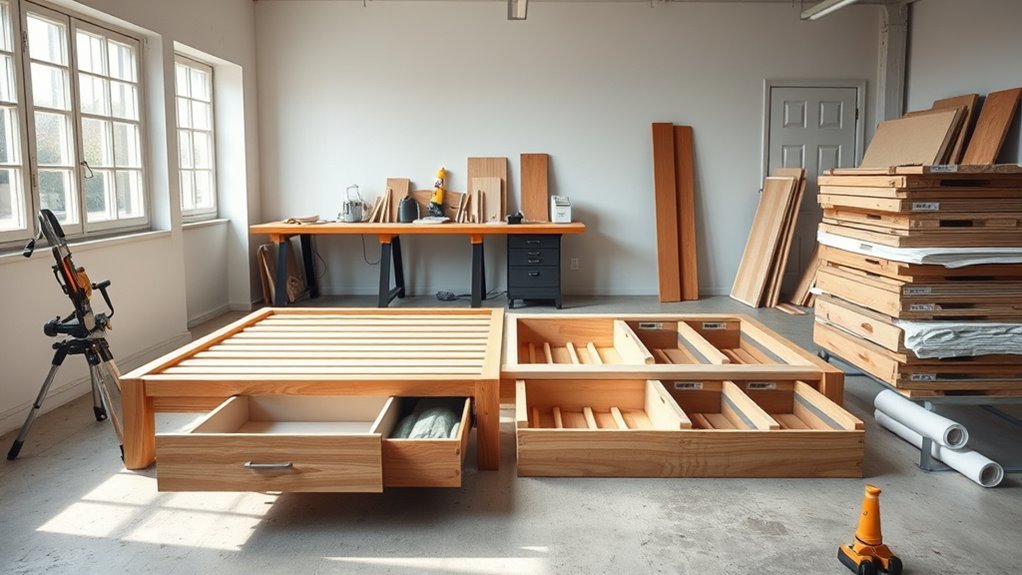
Think about how much storage you actually need under the king bed so you can size compartments or drawers appropriately.
Decide whether full-extension drawers, rolling bins, or simple open cubbies fit your tools, linens, and budget.
I’ll cover basic drawer construction options and mounting methods next so you can pick what works best.
Storage Capacity Needs
How much stuff do you need to store under your king bed — and how often will you access it? Think through volume, frequency, and organization before choosing drawers or open bins.
Measure clearance height, calculate cubic feet needed, and prioritize items you use seasonally versus daily. If you’ll reach often, aim for divided, easily accessible spaces; if it’s long-term storage, maximize volume.
- Measure largest item dimensions and add clearance for handles
- Estimate total cubic feet and compare to bed frame void
- Prioritize items by access frequency (daily, weekly, seasonal)
- Plan labeling and simple organization for retrieval
Drawer Construction Options
When you decide between open under‑bed storage and built‑in drawers, weigh access, durability, and construction complexity.
You’ll pick open bins for low cost and easy access; they’re simple to slide in, stack, and replace.
Choose built‑in drawers if you want a polished look, smoother access, and secured storage, knowing they need runners, face frames, and reinforcement.
Consider drawer height for mattress clearance and use full‑extension slides for reach.
Account for materials, labor, and occasional maintenance.
Sketch dimensions, test a mockup with cardboard, and factor drawer depth to avoid wasting space or blocking airflow beneath the mattress.
Choose Wood Species For Strength And Look
Although aesthetics matter, you should prioritize hardwoods that combine load-bearing strength with stable grain for a king-size frame, since the bed needs long-term rigidity and a clean look. You’ll want wood that resists warping, holds fasteners, and accepts finishes evenly. Consider tone, weight, and workability based on your tools and finish plan.
Hardwoods give durability; select species that match your budget without sacrificing structural needs. Avoid softwoods for main rails and legs unless you reinforce. Balance appearance with engineering: choose boards that stay straight and take glue and screws without splitting.
- Oak: strong, grainy, forgiving finish
- Maple: dense, smooth, light tone
- Walnut: durable, rich color, pricier
- Ash: resilient, shock-resistant, straight grain
How To Pick Quality Lumber At The Store
Because the lumber you pick sets the foundation for a sturdy, straight king-size frame, inspect boards carefully before you buy. Walk the rack, selecting straight, knot-free boards with even grain and consistent color.
Hold each board at eye level to spot warps, cupping, or twist; flatness matters. Avoid large knots, splits, or excessive sapwood.
Check moisture by asking staff for kiln-dried stock or using a moisture meter if available; target 6–8% for indoor furniture.
Match boards for thickness and appearance so joints align. Buy a few extra boards to account for defects and cutting waste.
Mill And Prepare Lumber At Home
Once you bring the lumber home, lay out each board and inspect it again, then flatten, joint, and rip to final widths so your pieces fit square and tight. You’ll mark grain direction, remove cupped or twisted sections, and mill boards to consistent thickness. Work with a planer and jointer, or rent them if needed, and keep dust control and eye protection on.
Arrange cut lists to minimize waste and label parts for headboard, rails, and slats. Final sand before assembly for glue and finish adhesion.
- Check moisture content; target 6–8% for indoor furniture
- True edges to 90° on the jointer
- Use stop blocks for repeatable lengths
- Stack stickers to acclimate lumber before final sanding
Pick Fasteners And Joinery For Your Skill Level
Match your fasteners and joinery choices to the tools you own and the skills you’re comfortable using. You’ll want to know when to use screws, pocket holes, biscuits, or mortise-and-tenon joints based on strength needs and ease of execution.
Pick options that give you reliable connections without pushing beyond your current skill set.
Tools And Skill Match
While you can tackle a king bed with basic tools, pick fasteners and joinery that suit the skills and equipment you actually have. Assess your toolset—drill, circular saw, clamps, router—and choose methods you can execute cleanly.
If you’re new, stick to pocket screws, biscuits, and glue for speed and forgiveness. Advanced tools open mortise-and-tenon or dovetail options, but don’t overreach.
Plan joints that you can measure and clamp reliably. Practice on scrap, then commit.
- Match joinery complexity to tool familiarity
- Prioritize strong, simple connections over flashy techniques
- Use jigs to improve repeatability
- Test assemblies before final glue-up
Fastener Types Explained
Now that you’ve matched joinery to your tools and comfort level, pick fasteners that suit both the load and your skill set. Choose screws for straightforward assembly: coarse wood screws for frame rails, pocket-hole screws for concealed joints, and lag bolts where strength matters, like connecting legs.
Use carriage bolts with washers and nuts for removable connections. Nails and brads work for trim but don’t rely on them for structural joints. Add glue at key seams for redundancy.
Match fastener length to material thickness, pre-drill to avoid splitting, and pick corrosion-resistant finishes if the bed will sit in a humid room.
Choose A Slat System: Solid, Spaced, Or Deck
Because the slat system you pick affects mattress support, ventilation, and longevity, you’ll want to weigh solid, spaced, and deck options before building the frame. You’ll choose based on mattress type, desired airflow, and noise tolerance.
Solid platforms give uniform support and reduce sagging.
Spaced slats boost ventilation and reduce weight.
A full deck creates a rigid surface that works with thin mattresses or foam.
Consider ease of construction, material cost, and future mattress changes when deciding.
Balance support and breathability for longevity.
- Solid platform: consistent support, less airflow
- Spaced slats: lighter, ventilates well
- Full deck: rigid, great for thin mattresses
- Consider material, cost, mattress type
How Many Slats And Proper Spacing For King Beds
You’ll want to aim for roughly 10–14 solid slats across a king frame to give even support and prevent sagging.
Keep spacing around 2–3 inches between slats (or tighter for foam mattresses).
Use sturdy hardwood or certified plywood for durability.
I’ll cover how count, spacing, and material choices affect comfort and mattress warranty.
Recommended Slat Count
When planning slat layout for a king bed, aim for enough boards to support the mattress evenly without creating pressure points—typically 10 to 12 solid slats (or 12–16 closely spaced thinner slats) across the 76‑inch width.
Space the slats about 2.5 to 3 inches apart center-to-center for solid slats or 1.5 to 2 inches for thinner slats or plywood support.
You’ll choose count based on mattress type, weight capacity, and slat thickness. Fewer thicker slats need secure attachment; more thinner slats distribute load better.
Check manufacturer recommendations and add a center support rail for heavy mattresses.
- Match slat material to mattress specs
- Verify load ratings
- Use consistent spacing
- Secure ends and center support
Optimal Slat Spacing
If you want a king bed that supports your mattress evenly and lasts, aim for slat spacing that matches your mattress type and slat thickness. You’ll typically place slats 2.5–3 inches apart for foam or latex mattresses, and 3–4 inches for innersprings. Thicker slats let you widen spacing; thinner slats need closer spacing or a center support. Count slats by dividing usable frame width by chosen gap plus slat width, rounding up. Check manufacturer recommendations. Visualize spacing with this simple guide:
| Mattress Type | Suggested Gap |
|---|---|
| Foam/Latex | 2.5–3″ |
| Innerspring | 3–4″ |
Slat Material Choices
Although material choice might seem minor, it directly affects how many slats you need and the spacing that will keep a king mattress supported and long-lasting.
Choose sturdy, springy wood like oak or maple for fewer, wider-spaced slats. Softer woods need more frequent support.
Metal slats can be slimmer and span further but check flex ratings.
Plywood strips work if laminated and reinforced.
Measure mattress type — memory foam needs closer spacing (under 3 inches), innerspring tolerates wider gaps.
- Oak or maple: strong, fewer slats
- Pine: economical, add more slats
- Metal: thin, high span
- Plywood: reinforce for strength
Create A Scale Drawing With Exact King Dimensions
Before you cut any wood, make a precise scale drawing of the king-size bed with exact dimensions so you’ll know how every board and fastener fits together.
Measure mattress width (76″) and length (80″), add allowances for frame thickness, overhang, and clearance.
Pick a scale (1″=1′) and draw top, front, and side views showing slat locations, rail widths, headboard position, and leg placement.
Note fastener types and spacing, dovetail or pocket-joint locations, and plywood panel sizes.
Label every dimension and material.
Double-check measurements against hardware and mattress before moving forward to cutting or assembly.
Convert Your Drawing Into A King Bed Cut List
Once your scale drawing’s finalized, turn it into a cut list that tells you exactly what to buy and cut: list each part by name, quantity, finished dimensions (length × width × thickness), material type, and any edge or grain orientation notes.
You’ll convert drawing measurements to finished sizes, note joinery allowances, and mark which pieces need matching grain or beveled edges. Be precise so parts fit without rework.
- Headboard panel: 1 — 76×40×1 (oak plywood), grain vertical, routed edge
- Side rails: 2 — 80×8×1.5 (solid oak), grain along length
- Footboard: 1 — 76×12×1.5 (oak), grain vertical
- Center support: 1 — 80×4×1.5 (pine), no grain match
Calculate Lumber Quantities And Optimize Cuts
With your cut list in hand, you’ll next figure out how much lumber to buy and how to lay out the cuts for the least waste. Tally each board size from the list, group identical lengths, and convert totals into full board quantities based on common lumber lengths (8′, 10′, 12′).
Sketch cut layouts on each board length, nesting shorter pieces into leftover spaces. Account for saw kerf (usually 1/8″) and add 10% for mistakes or defects.
Mark boards for grain and appearance-critical pieces. Buy labeled straight, defect-free stock, and keep offcuts organized for cleats or filler pieces.
Essential Tools You Need For A King Bed Build
Before you cut any wood, gather the right tools so the build goes smoothly. You’ll need a few power tools—like a circular saw or miter saw and a drill—for accurate cuts and strong joinery.
Plus, clamps and a sander to finish edges. Don’t forget essential hand tools such as a tape measure, square, hammer, and screwdrivers to keep everything precise.
Required Power Tools
You’ll need a handful of reliable power tools to build a sturdy king bed frame efficiently: a circular saw for ripping and crosscutting lumber, a drill/driver for fasteners and pocket holes, a random-orbit sander for smooth surfaces, and a router or jigsaw for rounded edges and cutouts.
Pick tools with good ergonomics and adequate power to handle hardwoods and plywood. Match blade types and bits to materials, and keep spare consumables.
Use proper clamps and safe setups when cutting or routing. Maintain batteries and cords for uninterrupted work.
- Circular saw (finish and framing blades)
- Cordless drill/driver (clutch control)
- Random-orbit sander (120–220 grit)
- Router or jigsaw (fine blades)
Essential Hand Tools
Although power tools speed the job, a handful of reliable hand tools give you control, accuracy, and finish options that machines can’t match. You’ll want a tape measure, combination square, and marking knife for precise layout.
A good set of chisels and a block plane help clean joints and trim tenons. Use a shoulder or dovetail saw for backed cuts and a crosscut for ripping when power isn’t ideal.
A set of screwdrivers, a ratcheting driver, and a hammer cover fastening and assembly. Add clamps in various sizes to hold glue-ups, and a sharp utility knife for trimming edges and veneer.
Optional Tools That Speed The Project
If you want to cut time and effort without changing the build, consider a few optional power tools and jigs that speed the project: a plunge router for clean dadoes, a track saw or circular saw with guide for straight rip cuts, a biscuit joiner or pocket-hole jig for fast strong joinery, and a cordless impact driver to drive screws quickly.
These tools help you work faster and produce cleaner joints and edges. You’ll still need basic skills and safety gear, but the optional tools reduce repetitive strain and increase accuracy for a neater, more efficient build.
- Faster, straighter rip cuts
- Cleaner joinery
- Repeatable dado and groove work
- Reduced assembly time
Rent Vs Buy: Tool Decisions For This Project
Having optional power tools can shave hours off the build, but you don’t have to own everything to get those benefits—renting often makes more sense for one-off projects like a king bed frame.
Assess how often you’ll use each tool: buy inexpensive, frequently used items (drill, sander), rent bulky or costly items (table saw, planer) you’ll use briefly.
Factor rental cost, transport, and learning curve against purchase price and storage.
Check tool condition before leaving the shop.
If you plan more projects within a year, buying may win; otherwise rent to save money and avoid clutter.
Safety Gear And Workshop Best Practices
Before you cut or assemble anything, make sure you’ve got the right personal protective equipment—safety glasses, hearing protection, and a dust mask or respirator when needed.
Keep your workspace tidy with clear walkways, good lighting, and tool storage so you can work efficiently and avoid trips or lost parts.
Use safe power tool techniques: secure workpieces, check guards and cords, and follow manufacturer instructions every time.
Appropriate Personal Protective Equipment
Because woodworking can throw dust, flying debris, and loud noise your way, you should suit up with the right personal protective equipment every time you work. Choose gear that fits, is rated for the task, and stays comfortable during long sessions. Replace worn items and inspect before use.
Pay attention to ventilation when using finishes and respirators, and keep fingers clear of blades with push sticks and guards. Store PPE where you’ll grab it before starting.
- Safety glasses or full-face shield
- NIOSH-rated respirator or dust mask
- Hearing protection (earmuffs or plugs)
- Cut-resistant gloves when handling rough lumber
Workshop Organization Essentials
When you lay out your tools, PPE, and work surfaces with intent, you cut distractions and hazards so you can focus on the build.
Keep a clear floor path and mark zones: cutting, assembly, finishing.
Store frequently used tools within arm’s reach and hang clamps and measuring tools on pegboards.
Use labeled bins for fasteners and small parts.
Keep a dedicated cleanup kit—shop broom, rags, trash, and a magnetic sweep—for quick resets.
Guarantee good lighting and ventilation, and place a sturdy workbench at a comfortable height.
Inspect PPE before work, replace damaged items, and review emergency exits and first-aid supplies.
Safe Power Tool Techniques
Although power tools speed the build, you’ve got to respect their force and know how to control them. Wear eye and ear protection, keep fingers clear, and never rush cuts. Check blades and bits for damage, secure workpieces, and test tools briefly before full use. Maintain a clean floor to prevent trips and keep cords away from cutting paths. Know emergency shutoffs and keep a first-aid kit handy. Follow these practices to reduce risks and stay efficient.
- Use guards and push-sticks for table saws
- Disconnect power before changing accessories
- Clamp materials firmly
- Keep a well-lit, ventilated workspace
How To Cut Consistent Frame Rails
If you want straight, matching rails your cuts need to be precise and repeatable, so set up a reliable stop and use the same method for every board. Measure twice, mark with a pencil and square, then clamp a sacrificial fence to your miter saw or circular saw guide to prevent tear-out.
Cut one rail, then use that finished piece as a template against the stop for subsequent cuts. Keep blade height and speed consistent, and rotate boards so grain orientation matches.
Label each cut piece immediately. Sand ends lightly for fit. Verify lengths before drilling or assembling to avoid waste.
Build The Outer Frame For A King Bed
Before you assemble anything, lay out the headboard, footboard, and side rails on a flat surface to confirm fit and orientation; this lets you spot mistakes and plan fastener locations so assembly goes smoothly.
Fit the rails into the headboard and footboard pockets or using brackets, clamp square, and check diagonal measurements to guarantee the frame is true.
Pre-drill pocket holes or pilot holes, then drive screws just enough to pull joints tight without crushing the wood.
Add corner blocking for rigidity and leave hardware accessible for later adjustments.
- Align components with clamps before fastening
- Use square and tape measure to verify squareness
- Pre-drill to prevent splitting
- Keep fastener heads slightly recessed
Install Strong Center Support And Legs
Where should the main support run and how many legs will you need to keep a king mattress stable?
Run a sturdy 2×8 or 2×10 center rail lengthwise beneath the mattress, aligned midframe from head to foot. Fasten it to the headboard and foot rail with bolts or heavy brackets.
Add at least three support legs: one at each end where the rail meets the rails and a third centered under the rail. Use adjustable steel legs or bolted wooden posts on a cleat for solid contact with the floor.
Check for level, tighten fasteners, and reinforce joints with metal plates as needed.
Attach Slats Or Build A Plywood Platform Deck
When you choose between slats or a plywood platform, think about support, mattress type, and ventilation. Slats give airflow and slight give, while a plywood deck creates a solid, uniform surface.
You’ll measure across the frame, cut slats or a sheet to fit, and position supports evenly.
For slats, space them 2–3 inches apart and screw into rails. Use battens under plywood to prevent sag.
Finish edges to avoid splinters and check level. Test with weight and adjust spacing or add glue where needed to eliminate squeaks.
- Measure twice, cut once
- Use exterior-grade plywood
- Pre-drill screw holes
- Sand and seal edges
Reinforce Joints For Long‑Term Durability
How will the bed hold up after years of use? You’ll reinforce joints with glue, screws, and metal brackets where load concentrates. Clamp while glue cures and pre‑drill to prevent splits. Use carriage bolts through long rails and locknuts on cross supports. Check for wobble, tighten hardware, and add corner blocks inside frames for extra shear strength.
| Joint Type | Reinforcement | When to Use |
|---|---|---|
| Butt | Glue + screws | Simple corners |
| Mortise/tenon | Glue + bolts | High load zones |
| Slat to rail | Metal brackets | Prevent rotation |
| Corner block | Screws | Long spans |
Build And Attach The Headboard Frame
Before you cut or fasten anything, lay out the headboard components on a flat surface and dry‑fit the frame so you can confirm dimensions, alignments, and mounting locations. You’ll square the assembly, mark joinery, and predrill pocket holes or dowel locations. Clamp pieces, check for gaps, and adjust shims as needed. Once satisfied, glue and fasten with screws or biscuits, wiping squeeze‑out.
Dry‑fit the headboard first: square the frame, mark joinery, clamp, predrill, shim for gaps, then glue and fasten.
Mount the headboard to the bed rails using sturdy brackets or through‑bolts, ensuring it’s level and centered. Finish sanding and seal exposed edges before final installation.
- Check squareness with a diagonal measurement
- Use clamps to maintain alignment
- Predrill to prevent splitting
- Verify bolt spacing against rail mounts
Add Footboard Or End Trim Details
If you want the bed to look finished and sturdy, add a footboard or end trim that matches the headboard’s style and ties into the rail mounting points.
Measure rail height and width, then cut trim pieces from the same material and profile.
Dry-fit the footboard, ensuring it aligns with rails and floor clearance.
Fasten with pocket screws or metal brackets into reinforced blocks for strength.
If you prefer a low-profile end trim, attach a cap board that conceals rail ends and hides fasteners.
Sand, fill joints, and finish to match the headboard so everything reads as one cohesive unit.
Construct Integrated Drawers Or Storage Boxes
When you plan drawers or storage boxes into the bed frame, lay out their sizes and slide clearances first so they fit the mattress platform and don’t interfere with rail or leg placement. Measure internal width and depth, then cut strong sides, bottoms, and backs from plywood.
Assemble boxes square, reinforce corners, and pre-finish interiors to resist wear. Make sure bottoms sit slightly proud of floor runners to avoid binding. Leave access for wiring if needed.
- Choose 3/4″ plywood for balance of strength and weight
- Add edge banding to visible plywood edges
- Cleat the boxes to the frame for support
- Ventilate large storage boxes to prevent mildew
Install Drawer Slides And Fit Drawer Fronts
How do you guarantee smooth operation and a clean face on your drawers? Mount the drawer slides level and square to the carcass, using the manufacturer’s templates and test screws before final fastening.
Attach matching slides to each drawer, keeping front-mounted or side-mounted systems aligned with consistent reveal. Fit drawer fronts temporarily with clamps or screws through cleats, check gaps top and sides, then mark and drill pilot holes for final attachment.
Use shims behind the front if needed to correct tilt. Operate drawers several times, adjust mounting screws for smooth travel, then tighten all hardware for a snug, flush finish.
Aligning, Leveling, And Squaring The Frame
Now’s the time to make sure the frame is square and sits true. You’ll check diagonals and adjust corners until they match.
Then confirm it’s level across the joists. Small shims and clamp adjustments will get the bed frame perfectly aligned before you finish.
Check Frame Square
Ready to make sure your frame sits true? You’ll square the rectangle, adjust corners, and lock positions before fastening. Use measuring, diagonals, and simple jigs to confirm accuracy so the mattress won’t bind or sag.
- Measure corner-to-corner diagonals; they should match within 1/8″ for a tight fit.
- Confirm each corner forms a clean 90° with a carpenter’s square or speed square.
- Clamp and shim temporary spacers, then recheck diagonals after tightening clamps.
- Re-measure after final screws; small deviations now cause big issues later, so correct them promptly.
Level Across Joists
Once the frame is square, you’ll check and adjust its height across the joists so the bed sits perfectly flat and the load’s distributed evenly. Use a spirit level along multiple cross members and diagonals; shim where gaps show and tighten fasteners gradually so adjustments don’t twist the frame.
Measure clearance from the floor at each corner to confirm uniform height. If joists vary, pack shims beneath support rails or use adjustable brackets to compensate.
Recheck level after bedding components are added. When every point reads level and measurements match, the frame will support the mattress safely and quietly for years.
Troubleshooting Fit And Wobble Issues
If parts don’t seat properly or the frame rocks when you sit on it, you’ll want to inspect connection points, fasteners, and alignment before tightening everything down. Check for gaps, warped lumber, or uneven legs and loosen bolts to reseat joints.
Use a level and straightedge to verify rails and center supports. Replace stripped screws or use larger washers where needed. Tighten fasteners in a cross pattern to draw pieces evenly.
If a shim’s required, use thin hardwood or metal shims, not paper. Recheck after loading the mattress to confirm wobble is eliminated.
- Verify joint faces are flush
- Swap damaged hardware
- Adjust leg heights with shims
- Torque bolts evenly
Sanding, Filling, And Prep For Finish
Start by sanding in stages—coarse to fine grit—to smooth faces and edges without rounding profiles.
Fill seams and knots with a suitable wood filler, then sand the repairs flush once they cure.
Finish preparation means removing dust, checking for low spots, and wiping with a tack cloth so your stain or topcoat goes on evenly.
Surface Sanding Sequence
Before you apply any finish, sand the entire frame in a logical sequence so you get smooth, consistent surfaces that accept stain or paint evenly. Start coarse and work finer: remove tool marks, blend joints, and follow grain direction. Keep sanding blocks or orbital sanders flat to avoid gouges. Vacuum and tack between grits to spot low spots. For edges, sand by hand for control.
- Begin with 80–100 grit to level and remove mill marks
- Move to 120 grit to refine surfaces and joints
- Finish with 180–220 grit for a receptive surface
- Clean thoroughly before filling or finishing
Seam And Knot Filling
While the frame is smooth from sanding, you’ll need to address seams and knots so your finish goes on uniformly. Inspect joints, glue lines, and knotty areas under good light.
Use a matching wood filler or epoxy for open knots; force it into voids, let it cure, then trim flush.
For tight seams, apply a thin bead of wood glue or grain filler, wipe excess, and clamp briefly if needed.
After curing, sand filled spots level with surrounding wood using fine-grit paper.
Clean dust with a tack cloth. Proper filling prevents blemishes and guarantees an even stain or topcoat later.
Final Prep For Finish
When you’ve filled knots and smoothed joints, go over the whole frame with progressively finer grits to create an even surface that accepts finish predictably. Work with the grain, keep pressure even, and vacuum between grits to avoid clogging. Check edges and hidden joints for missed fill. Wipe with tack cloth, then inspect under raking light for imperfections. If needed, spot-fill and sand again until uniform.
- Sand from 80→120→180→220 grit, using a block or orbital sander
- Remove dust with brush, vacuum, then tack cloth
- Mask hardware and gaps to prevent finish buildup
- Test stain or sealer on scrap first
Staining Wood For Even Color And Protection
Want the bed frame to look consistent and last for years? You’ll prep, condition, stain, and seal carefully. Sand to 180–220 grit, wipe dust, and apply a wood conditioner for softwoods. Test stain on scrap, work with the grain, and wipe excess to avoid blotches. Let each coat dry fully; sand lightly between coats for smoothness. Finish with a protective topcoat appropriate for bedroom furniture.
| Step | Tip |
|---|---|
| Prep | Sand, clean, condition |
| Stain | Test, apply with grain |
| Wipe | Remove excess promptly |
| Seal | Choose durable clear coat |
Painting Techniques For Smooth Results
Before you paint the bed frame, make sure you sand, clean, and prime the surfaces for an even finish.
Use thin, consistent coats and a quality brush or roller to avoid drips and brush marks.
Between coats, lightly sand and remove dust so the final coat goes on smooth.
Surface Preparation Steps
One essential step to a professional-looking finish is thorough surface preparation — you’ll strip old paint or varnish, sand to smooth imperfections, fill holes or gaps, and clean off dust and grease so new paint adheres evenly and dries without flaws.
You’ll inspect joints, remove loose fibers with a tack cloth, and use appropriate fillers that sand smoothly. Prime bare wood or patched areas to equalize absorption and prevent blotching. Take time here — it saves rework later.
Follow these focused steps:
- Choose grit sequence for progressive smoothing
- Apply filler, let cure, then sand flush
- Degrease with solvent or mild detergent
- Mask edges and hardware securely
Paint Application Tips
Once the surface’s prepped and primed, apply paint with steady, overlapping strokes to avoid lap marks and guarantee an even coat. Use a high-quality brush for edges and a foam roller for flat panels; keep a wet edge and work from top to bottom.
Thin coats dry faster and level better than one heavy coat, so sand lightly between coats with fine grit. Maintain consistent pressure and speed to prevent texture differences.
Clean drips immediately and watch for runs under bright light. Allow full drying time before handling or reassembling the frame to assure a durable, professional finish.
Applying Clear Finish And Maintenance Tips
Ready to protect and bring out the wood’s natural beauty? Apply a clear finish—polyurethane, Danish oil, or wipe-on varnish—after sanding to 220 grit. Work in thin, even coats, follow the grain, and sand lightly between coats with 320 grit. Let each coat cure fully; temperature and humidity matter.
- Choose finish based on sheen and durability needs.
- Use a high-quality brush or lint-free cloth to avoid bubbles.
- Remove dust with tack cloth before every coat.
- Perform annual checks; clean with mild soap, reapply spot coats where wear appears.
This keeps your bed frame durable and attractive.
Transporting And Assembling In The Bedroom
Before you bring the pieces into the bedroom, measure doorways and stairways and plan the route so nothing gets stuck or damaged. Get help for heavy parts and use moving straps or a dolly to protect floors and frames. Lay felt pads or cardboard down to prevent scratches.
Assemble larger subassemblies in the room to avoid tight turns. Keep hardware sorted in labeled bags and follow your markings so parts align quickly. Use a cordless drill with the correct bits and check level and squareness as you tighten.
Clean debris, remove tools, and test fit slats before finishing touches.
Attach The Mattress And Test Weight Support
After you’ve cleared the room and confirmed the slats and frame are square, set the mattress on the bed and align it with your headboard and side rails. Sit and lie in different spots to check even contact across slats and rails. Watch for gaps, pressure points, and frame flex. If you detect uneven support, note the location for reinforcement.
Set the mattress, align to the headboard and rails, then sit and lie across the bed to spot gaps or flex.
Test with combined weight—two people or weighted bags—to simulate real use, checking for creaks or excessive give.
- Walk around and inspect joint fittings while loaded
- Measure any visible sag between slats
- Tighten fasteners after load testing
- Mark spots needing extra support
Quick Fixes For Squeaks And Shifting Slats
If you hear squeaks or notice slats shifting, start by tightening all frame hardware to eliminate loose connections.
Check and secure the slat supports so each slat sits firmly in place.
These quick fixes should stop most noise and movement before you try anything more involved.
Tighten Frame Hardware
Notice a squeak or a shifting slat? Tighten frame hardware first — loose bolts and brackets are usually the culprits. You’ll need basic tools: wrench, screwdriver, and possibly an Allen key.
Work methodically: tighten connections but avoid over-torquing wood screws. Check metal brackets, corner bolts, and center support fasteners.
After tightening, test the bed by applying weight and listening for noise.
- Inspect all visible bolts and nuts for looseness.
- Retorque wood screws incrementally to prevent stripping.
- Replace stripped or damaged fasteners with same-size hardware.
- Use thread-locking compound on metal-to-metal joints if squeaks persist.
Stabilize Slat Supports
Want a quick fix for squeaks or shifting slats? Start by checking slat placement and spacing; uneven gaps cause movement. Tighten any loose slat screws or bolts, then add rubber or felt pads where slats meet the center support and side rails to dampen noise.
If slats still slide, install small L-brackets or wood blocks at each end to hold them in place. For persistent squeaks, apply a thin coat of wax or bar soap on contact points, or use a silicone spray on metal fittings.
Recheck after a few nights and adjust blocks or padding as needed for a solid, quiet bed.
Cost‑Saving Tips Without Sacrificing Strength
While you might be tempted to cut corners, smart choices let you save money without compromising strength. Prioritize hardwood only where load concentrates—legs, center beam—and use plywood or pine elsewhere. Buy dimensional lumber in longer lengths to reduce joints and fasteners. Reuse solid pieces from discarded furniture for crossmembers. Shop recycled or surplus stores for brackets and hardware; a few quality connectors beat cheap screws.
- Reinforce joints with glue plus screws for durability.
- Rip wider boards from cheap stock to get exact widths.
- Pre-drill to avoid splits and wasted boards.
- Choose standard sizes to minimize costly cuts.
Style Upgrades: Trim, Molding, And Hardware
How do you give a simple king bed frame a finished, custom look without overcomplicating the build? Add trim and molding to hide joints and create profile lines—start with simple baseboard or 1×2 trim, miter corners, and glue plus brad-nail for clean attachment.
Choose crown molding for a traditional headboard edge or flat stock for modern lines. Pick hardware that complements style: low-profile metal brackets for minimalist, decorative pulls or corner caps for vintage flair.
Pre-drill to prevent splitting, sand seams, and test-fit pieces before final fastening so upgrades look intentional and durable.
Child‑And Pet‑Safe Finishes And Design Choices
Thinking about safety first will keep your king bed frame both beautiful and kid- and pet-friendly: choose low-VOC or water-based finishes, round or chamfer exposed edges, and secure loose trim so small hands and paws can’t get pinched or pull things off.
You’ll pick finishes that resist chewing and are easy to clean, fasten hardware with tamper-resistant screws, and hide gaps where toys or claws could get stuck.
Consider non-slip feet to prevent sliding and avoid small detachable parts.
Balance aesthetics with durable, non-toxic materials so the bed lasts and stays safe for your family.
- Use wipeable, low-VOC paint or stain
- Round edges and soften corners
- Secure trim and cover screw heads
- Add non-slip pads or recessed feet
Adapt This Plan For California King Or Split King
If you’re switching to a California king or a split‑king setup, you’ll mostly scale the rails and platform while keeping the same joinery and hardware choices—adjust the long rails to 84″ for a Cal king, or build two 38″-wide twin platforms and a common center support for a split king.
Measure mattress depth and perimeter; increase slat count or spacing to maintain support. Use the same leg placement but add a midspan support under longer rails.
For split kings, align bolt patterns so two frames sit flush; use interlocking brackets or a center rail to prevent separation. Recut headboard/backboard attachment widths accordingly.
When To Hire A Pro: Signs It’s Too Big
When a project grows beyond straightforward cuts and standard fasteners, you’ll want to contemplate hiring a pro. Signs include complicated load-bearing modifications, difficult site access, or custom joinery that requires specialized tools and experience.
When projects outgrow simple cuts and common fasteners, consider a pro for complex loads, access, or custom joinery
If you’re unsure about structural integrity, precise tolerances, or finishing that must match existing millwork, get help. Pros save time and reduce costly mistakes when leveling, routing, or integrating electrical lighting.
You shouldn’t gamble on safety or costly rework.
- Structural modifications needing engineering input
- Narrow stairs, elevators, or tight corners for delivery
- Complex joinery like mortise-and-tenon under load
- Integrated wiring or built-in storage systems
Project Timeline: Realistic Schedule And Milestones
After you decide whether to call in a pro, map out a realistic project timeline so you don’t underestimate time or materials. Break the build into clear milestones:
planning and materials (1 day),
cutting and prepping lumber (1–2 days),
assembly of frame (1 day),
slats and support installation (half day),
sanding and finishing (1–2 days),
and final inspection plus mattress fit (half day).
Factor in drying time for finishes and unexpected delays. Assign buffer days, prepare tools and fasteners before starting, and schedule help for heavy lifting.
Track progress against milestones so you can adjust scope or pacing as needed.
Frequently Asked Questions
Can I Add an Adjustable Base Compatibility to This DIY King Frame?
Yes — you can add adjustable base compatibility if you reinforce the center support, leave clearance for motor and hinge travel, use sturdy slats or a platform, and secure anchors so the base moves safely without stressing the frame.
How Do I Childproof the Frame Beyond Finish and Hardware Choices?
You should round or pad exposed corners, secure slats and joints with anti-slip brackets, anchor the frame to the wall, hide gaps with trim, use non-toxic finishes, and add removable corner guards and low-profile rails for safer edges.
What Insurance or Permits Apply if I Sell a Built Bed Commercially?
You’ll need business liability insurance, product liability coverage, and workers’ comp if you hire help; you’ll also get a business license, register for sales tax, and check local building, safety, and resale permits before selling beds commercially.
How to Disassemble the Frame for Moving Between Floors or Tight Stairs?
You’ll unbolt rails from headboard and footboard, remove slats and center support, label and bag fasteners, and disassemble side rails into manageable sections. Wrap pieces, carry them separately, and reassemble on the new floor.
Are There Special Considerations for Radiant Floor Heating Under a Platform?
Yes — you’ll need thermal clearance, insulating layers, and non‑conductive supports so heat circulates evenly. Use moisture‑stable materials, avoid trapping tubing, allow expansion gaps, and follow your heating manufacturer’s clearances and local code requirements.
Conclusion
You’ve got the know‑how to build a sturdy, comfortable king bed frame that fits your room, budget, and lifestyle. Start with accurate measurements, pick materials that match your skills, and prioritize safe finishes for kids and pets. Tackle one step at a time, and adapt the plan for California or split king needs. If complexity or load requirements feel overwhelming, don’t hesitate to hire a pro—better safe and supported than sorry.