You can build a sturdy live-edge table in a weekend by selecting a dry, stable slab, flattening one face, and thicknessing to balance weight and appearance. Remove loose bark, mark and reinforce mounting zones, then attach a flat, stable base with slotted fasteners to allow seasonal movement. Fill voids or cracks with epoxy or wood Dutchmen, sand through grits, and apply your chosen finish. Follow the step-by-step process below to learn the practical tips and tricks.
Quick Build Overview: Outcome, Time, and Skill Level
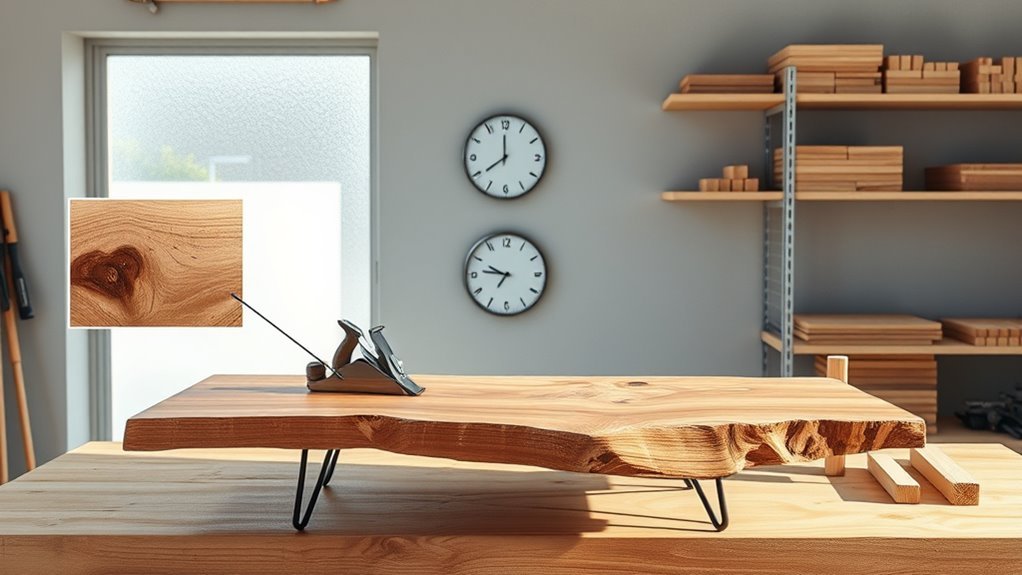
If you want a striking, functional centerpiece without a long workshop commitment, this quick-build method gets you there: a stable live edge table with natural character, finished surface, and sturdy base in about a weekend of focused work.
A striking live-edge table—finished, stable, and ready in a focused weekend of DIY woodworking.
You’ll end up with a one- or two-slab tabletop (30–36 inches deep, length per preference), sanded, filled where needed, and sealed with a durable oil or polyurethane.
Plan on about 10–16 hours spread over two days.
Skill level: beginner-plus — you should be comfortable with a circular saw, sander, drill, and basic joinery.
Safety gear and precise measuring are essential.
Why Choose a Live-Edge Table?
Why pick a live-edge table? You’ll get a functional piece that celebrates natural form and adds instant character to any room. It blends rustic warmth with modern simplicity, and it’s durable when built right.
- Unique aesthetic: No two slabs match, so your table’s one-of-a-kind.
- Connection to nature: Preserved edges and grain keep organic shapes and stories visible.
- Versatility: It fits styles from minimalist to industrial and works as dining, desk, or console table.
You’ll enjoy a handcrafted focal point that ages gracefully and sparks conversation.
Best Wood Species for Live-Edge Tables
Which wood should you pick for your live-edge table depends on the look, durability, and budget you want. Choose hardwoods like walnut for rich color and stability, oak for strength and grain, maple for pale, clean tones, cherry for warm aging, or cedar for rustic, aromatic character. Consider hardness, finish response, and cost when deciding. Below is a quick comparison to guide choices.
| Species | Notable traits |
|---|---|
| Walnut | Deep color, stable |
| Oak | Durable, pronounced grain |
| Maple | Hard, light, smooth finish |
| Cherry | Warm patina over time |
| Cedar | Rustic, aromatic, softer |
How to Evaluate Slab Size, Grain, and Edge Character
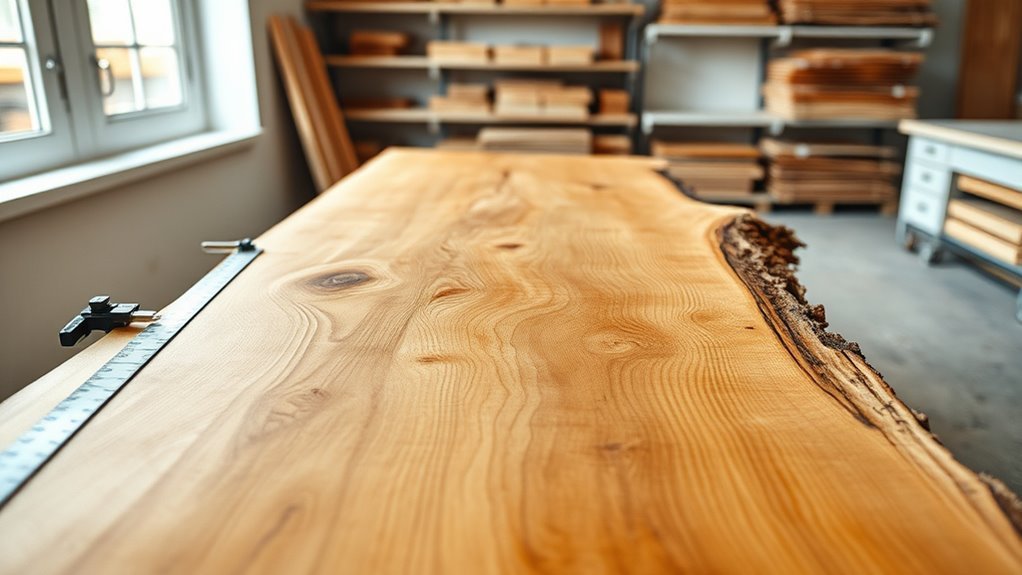
When choosing a slab, you’ll first check dimensions to make sure it fits your space and supports the table’s purposeful use.
Pay attention to grain pattern and movement so the board’s figure complements your design and you can plan for drying or stabilization.
Finally, inspect the natural edge for character and defects so you can decide how much of the bark, voids, or live detail to keep.
Slab Dimensions And Fit
Because the slab sets the table’s presence, you should carefully assess its length, width, and thickness to guarantee it fits your space and supports designated use. Measure room clearance, seating layout, and path flow; account for overhangs and base placement.
Check thickness for structural needs—thin slabs need reinforcement, thick slabs affect weight and transport.
Inspect edge character for straightness where it mates to bases, and confirm live edges won’t interfere with chair backs.
Consider trimming allowances and whether you’ll join slabs.
Balance aesthetics with practicality so the slab both fits and performs.
- Measure clearance and seating
- Verify structural thickness
- Confirm edge alignment
Grain Pattern And Movement
How do the slab’s grain and edge character affect both appearance and long-term stability? You’ll assess grain direction, figure, and growth rings to predict movement and match halves. Straight grain resists cupping; interlocked or wavy grain can twist. Wider slabs move more across the width; consider quarter-sawn pieces for stability. Check edge character for bark pockets or voids that need reinforcement. Plan joinery and allowances for seasonal movement when sizing and placing slabs.
| Feature | What to look for |
|---|---|
| Grain direction | Straight vs. wavy |
| Movement risk | Width and seasoning |
| Figure | Affects appearance |
| Edge issues | Voids, bark pockets |
Natural Edge Characteristics
Although the slab’s size and natural edge may look simple at first glance, you should inspect them with purpose. Measure length, width, and usable surface, ensuring proportions match your space. Check thickness for stability and plan for flattening.
Study grain flow for visual movement; knots, spalting, and color shifts add character but affect strength. Examine the live edge for bark inclusions, rot, or voids that need filling or stabilization.
Consider how edge contours will read against legs and room scale. Decide whether to preserve raw texture or refine it to suit your design intent.
- Measure dimensions precisely.
- Read grain movement.
- Inspect edge integrity.
Spotting Slab Defects: What to Avoid
When you inspect a slab, look for flaws that will compromise the table’s strength or appearance: deep checks and splits, extensive sapwood or rot, large voids and punky areas, and severe twisting or cupping.
Check edges for unstable bark or loose cambium that won’t adhere. Tap the face and listen for dull sounds indicating internal decay. Note pervasive insect galleries and soft pockets you’ll have to fill or cut away.
Avoid slabs with irregular grain runout at join points that hinder stable mounting. Record defect locations, then decide whether repair, reinforcement, or passing on the slab is safest.
How Dry Should Your Slab Be? Target Moisture Levels
After you’ve marked defects and decided which slab is usable, check its moisture content before you start milling and finishing. Your slab should be near equilibrium with your shop: generally 6–8% for indoor furniture in stable, conditioned homes, or up to 10–12% if the piece will live in a humid environment.
Before milling, confirm slab moisture—ideally 6–8% for indoor furniture, up to 10–12% for humid environments.
Too wet and the slab will twist or crack as it dries; too dry and glue-ups or finishes mightn’t bond properly. Aim for consistent readings across the slab; avoid wide variation between ends or heartwood and sapwood.
- Target range
- Risks of high moisture
- Check for consistency
Use a Moisture Meter: Step‑By‑Step

Before you mill or glue anything, grab a reliable moisture meter and take systematic readings so you know exactly where the slab sits relative to your target range.
Start by measuring multiple spots: center, near each edge, and both faces. Record each value and the location.
For pin meters, insert pins where grain is stable; for pinless, keep sensor flat and move slowly.
Compare readings to your target moisture content.
Recheck after acclimating the slab in your shop for 24–72 hours.
If readings vary, map the gradient and plan drying or stabilization before proceeding with milling or joining.
Kiln-Dried vs Air-Dried vs Green Slabs
If you’re choosing slabs for a live-edge table, you’ll want to know how kiln-dried, air-dried, and green stock differ in moisture, stability, and workability. You’ll pick based on time, movement risk, and finishing needs.
Kiln-dried is stabilized, quick to use, and less likely to warp.
Air-dried reduces moisture gradually but can retain slightly higher MC, so plan acclimation.
Green slabs are cheapest and dramatic but demand long drying and careful monitoring to avoid cracking; you’ll need to control drying or slab will check.
Match your build timeline and joinery to the slab’s moisture profile.
- Kiln-dried: stable, ready
- Air-dried: slower, moderate risk
- Green: dramatic, requires drying
Estimate Costs: Slabs, Tools, and Finishes
When budgeting, think in three buckets: the slab itself, the tools you’ll need (and don’t already own), and the finish materials and hardware.
Slab prices vary by species, size, and figure—expect $100–$2,000+. Check moisture content and defects; cheaper slabs can cost more to stabilize.
Slab costs range widely—$100 to $2,000+. Inspect species, size, moisture, and defects before buying.
For tools, itemize purchases versus rentals and include blades, sanders, and clamps; avoid listing basic tool details covered later.
Finishes and hardware include epoxy, oils, polyurethane, screws, and legs—estimate by surface area and quality.
Add 10–20% contingency for waste, unexpected repairs, and shipping.
Essential Tools for a Live-Edge Build
Because a successful live-edge build depends as much on the right tools as on good wood, you’ll want a concise kit that covers cutting, flattening, joining, and finishing without clutter. You’ll need reliable, versatile gear so you can process slabs, correct warp, join pieces, and apply finishes cleanly.
- Chainsaw or bandsaw for milling plus a circular saw or track saw for trimming and ripping.
- Router with a slab flattening sled or router plane, and a jointer/planer alternative like a drum sander or hand planes.
- Biscuit joiner or pocket-hole jig, bar clamps, random-orbital sander, and finish brushes.
Safety Gear and Shop Setup Checklist
Before you start cutting and sanding, make sure you’ve got the right personal protective equipment—gloves, eye and ear protection, and a proper respirator.
Check your shop ventilation and dust collection so airborne particles don’t become a health hazard.
Arrange tools for easy access, secure cords and outlets, and confirm your electrical setup can handle the load.
Personal Protective Equipment
How will you protect yourself while working on a live edge table? You’ll wear the right PPE every step. Select safety glasses with side shields, a NIOSH-rated dust mask or respirator for finishing tasks, and hearing protection for power tools.
Keep gloves for rough handling and nitrile for finish chemicals. Guarantee proper footwear and avoid loose clothing. Inspect gear before each use and replace damaged items. Store PPE where it’s accessible.
Train yourself on correct fit and use, and signal others when tools are running. Consistent PPE use prevents injuries and lets you focus on craftsmanship.
- Safety glasses
- Respirator/dust mask
- Hearing protection
Shop Ventilation And Dust Control
Your PPE protects you at the tool, but good ventilation and dust control keep the whole shop safer and your respirator from getting overworked.
Set up a cross‑flow of fresh air—intake and exhaust—to flush fine particles.
Use a dedicated dust collector on stationary tools and a high‑quality shop vac with HEPA filtration for handheld work.
Seal gaps and use blast gates to focus suction where you cut or sand.
Add an air cleaner with true HEPA for lingering dust.
Clean filters regularly, sweep with a vac, and wear a respirator when tasks generate visible dust or prolonged airborne particulates.
Tool Layout And Electrical Safety
When you lay out tools and plan electrical runs, think of the shop as a workflow map that keeps power, dust control, and safety within easy reach. Arrange benches, saws, and planers so cords don’t cross walkways; mount outlets near stations and use dedicated circuits for high-draw tools. Keep extension cords temporary and use cable management to prevent trips. Label breakers and test GFCIs regularly.
Store PPE—respirator, ear protection, eye protection—by the door so you won’t forget it.
- Position tools for linear workflow and clear egress.
- Install GFCI and dedicated circuits.
- Keep PPE accessible and maintained.
Removing Bark and Loose Material Safely
Before you start stripping the bark, clear the work area and put on safety gear—gloves, eye protection, and a dust mask—so you can work confidently and avoid splinters, debris, or inhaling dust.
Use a sharp drawknife or chisel to remove loose bark, working with the grain and keeping tools at a low angle to prevent gouges. Tap stubborn sections with a mallet, then switch to a stiff brush or scraper for smaller fibers and crevices.
Check for insects or rot as you go, removing compromised wood.
Keep debris contained and dispose of it properly to maintain a clean, safe workspace.
Flattening a Slab: Router Sled, Planer, or Jointer
When you need a flat, stable surface on a live edge slab, you’ll choose between a router sled, a planer, or a jointer based on slab size and thickness.
A router sled lets you flatten wide, irregular boards without removing much material, while a planer or jointer can be faster on straighter, thinner stock.
Think about your slab’s dimensions, the amount of waste you’ll tolerate, and the gear you already have before you start.
Router Sled Overview
If you’ve got a heavy, cupped live edge slab that a planer or jointer can’t handle, a router sled gives you a reliable way to flatten it yourself. You build a stable frame spanning the slab, mount rails, and slide a router with a straight bit across the surface in controlled passes.
It removes high spots and creates a consistent reference plane without forcing the slab through a machine. You’ll control depth, feed rate, and pattern to minimize tearout and save material.
- Durable sled frame for stability
- Proper bit and cutting strategy
- Progressive passes and inspection
Planer Vs. Jointer
After you’ve flattened a slab with a router sled, you’ll still weigh whether a planer or jointer would be faster or safer for future jobs—each tool handles thickness and faces differently.
You’ll use a jointer to establish one flat face or a straight edge before planing; it excels at long, straight edges and initial face flattening on slabs supported safely.
A planer quickly brings thickness to final dimension once both faces are parallel, but it can pinch and kickback on cupped stock.
For safety and speed, joint first if you can, then plane; for small, already-flat pieces, you may plane directly.
Filling Voids: Epoxy vs Wood Dutchman
Deciding how to fill the natural voids in a live edge slab shapes both the table’s look and its longevity, so you’ll want to weigh epoxy pours against wood dutchmen carefully.
Choosing how to fill a live-edge void—epoxy’s bold seal or a wood dutchman’s natural match—defines appearance and durability.
You’ll choose epoxy for glossy, waterproof fills and dramatic color options; it stabilizes irregular voids and bonds well to wood.
Choose a wood dutchman to maintain natural grain, easier repairability, and a traditional aesthetic; it requires careful fitting and glue.
Consider resin thickness, tint, and cure time versus matching species, grain orientation, and seasonal movement when deciding what suits the slab and your skill level.
- Epoxy: waterproof, bold looks
- Dutchman: natural grain match
- Decide by movement, maintenance
Stabilize Cracks With Butterfly Keys and Splines
Once you’ve chosen how to fill larger voids, you’ll want to stabilize long cracks and weak grain so they don’t spread as the slab moves. You’ll fit butterfly keys across tension points and thin splines along hairline cracks; both lock wood and add visual interest. Fit keys tight, glue with epoxy or PVA, and clamp until set. Cut splines to match grain and keep them shallow to avoid tear-out. Sand flush and finish to reveal contrast. Small reinforcements prevent future splits and feel deliberate—a crafted solution that respects the live edge.
| Strength | Beauty | Intention |
|---|---|---|
| durable | warm | mindful |
| secure | honest | lasting |
Trim and Square the Ends
Start by measuring and marking the ends carefully so you know exactly where to cut.
Clamp a straightedge guide to keep your saw on track as you trim.
After cutting, check squareness with a square and make any small adjustments needed.
Measure And Mark Ends
Before you cut, measure and mark both ends carefully so the table sits square and the slab fits your base. Use a reliable tape, a carpenter’s square, and a pencil. Verify diagonal measurements across the full width to confirm squareness, then transfer marks to the face and edge so your cut aligns visually.
- Double-check overall length and mark with a clear, thin pencil line.
- Use a square to extend that line across thickness and both faces.
- Measure diagonals; adjust marks until diagonals match within 1/16″.
Keep marks light and recheck before cutting.
Use A Straightedge Guide
When you need a dead-straight, square end on a live-edge slab, clamp a straightedge guide to the face and use it to run your saw or router along the line. This gives you a reliable fence that prevents the blade or bit from wandering and guarantees the cut follows the pencil marks exactly.
Position the guide so the cut removes minimal material and keeps the live edge intact. Use sacrificial backing to reduce tearout, and secure the slab to prevent movement.
Check the guide for parallelism to your marks, set blade/router depth, make steady passes, and clean the cut with a block plane or sanding.
Cut And Check Squareness
With your straightedge guide set and the live edge preserved, it’s time to trim the slab ends square so the table sits true. Clamp the guide, mark your cut, and use a circular saw with a fine blade to slice slowly.
Check both ends with a framing square and measure diagonals for true parallelograms. If one end needs a touch-up, make small passes until both faces align.
- Cut: follow the guide, steady feed, keep blade vertical.
- Verify: use a square and tape measure, confirm 90°.
- Adjust: remove minimal material, recheck diagonals, ensure flat bearing.
Create a Flat Underside for Mounting Legs
To mount your legs securely, you’ll need a flat, stable underside on the live edge slab so the hardware sits flush and the table doesn’t wobble.
For secure leg mounting, create a flat, stable underside so hardware sits flush and the table won’t wobble.
Flip the slab onto sacrificial boards, support with even blocks, and mark mounting zones where braces or plates will attach.
Use a router sled or planer to remove high spots, working in light passes and checking with a straightedge.
Keep the plane parallel to the tabletop plane and preserve thickness where needed.
Clean screw recesses and countersink holes for hardware.
Sand lightly to remove tool marks, then test-fit legs and adjust until the underside sits uniformly flat.
Choosing Leg Styles: Hairpin, Steel, or Wood
Now you’ll pick legs that balance form and function. Hairpin legs give minimalist strength without stealing attention from the slab, while steel or wood options let you match the table’s style—industrial edge or warm, rustic tones.
Choose the material that complements your slab and supports its size.
Hairpin Legs: Minimalist Strength
When you want a look that’s both airy and sturdy, hairpin legs deliver minimalist strength without stealing the spotlight from your live edge top. You’ll appreciate their slim profile, easy installation, and reliable support for most table sizes.
They let the wood remain the focal point while giving a modern, mid-century vibe. Choose steel finishes that resist scratches and weigh the gauge for load capacity. Mounting plates hit studs or use quality anchors.
Maintain with occasional tightening and rust prevention if needed.
- Easy install
- Space-saving visual
- Durable support
Wood Or Steel: Style Match
Although your live edge top steals the show, the leg material sets the table’s final mood and performance. Wood legs warm and blend with organic shapes, steel legs give a sleek, industrial edge, and hairpin or tube steel offer minimalist support with visual lightness.
You’ll match style to room: choose matching wood species for seamless cohesion or contrast for interest. Consider function: steel resists movement and supports larger spans; wood adds heft and traditional joinery options.
Think scale, finish, and hardware visibility. Budget and skill matter too—hairpins are affordable and simple, custom steel frames cost more but deliver precise, durable geometry.
Measure and Mark Accurate Leg Placement
Before you drill or clamp anything, measure and mark the exact leg locations so the table will sit level and the load will be evenly distributed. Use a reliable tape, square, and straightedge.
Find centerlines front-to-back and side-to-side, account for slab taper, and mark offsets for leg plates or blocks. Double-check diagonal measurements to confirm squareness before committing.
- Measure: record distances from edges and center.
- Transfer: use a marking knife or pencil and a square.
- Verify: measure opposing points and diagonals; adjust until equal.
Keep marks light and retrace after final confirmation.
How to Attach Metal and Wooden Legs Securely
Before you attach legs, make sure the underside of your tabletop is flat, clean, and reinforced where the hardware will sit so screws or mounting plates won’t pull through.
For metal legs, mark and predrill holes for machine screws or use threaded inserts.
For wooden legs, use glue blocks or corner cleats and long wood screws to distribute load.
Tighten hardware incrementally and check for wobble, then re-tighten after the table has settled.
Preparing Mounting Surfaces
How will your legs hold up under daily use? You’ll want flat, level mounting surfaces free of bark, voids, and wobble. Plane and sand the underside where legs meet the slab until it’s uniformly flat; check with a straightedge.
Reinforce thin spots with epoxy or a biscuit/glue-in spline so the mounting area carries load.
For metal legs, mark and drill pilot holes to avoid splitting; for wooden legs, ensure mating faces are flush and clamped during glue-up.
Seal the prepared area with finish to prevent moisture shift. Test fit everything dry before final assembly.
- Flatten and straighten
- Reinforce weak grain
- Seal and test fit
Fastening Leg Hardware
When you’re ready to attach legs, choose hardware and fasteners that match the leg type and the slab’s thickness. Then align and clamp everything before driving screws or setting bolts.
For metal legs, use threaded inserts or T-nuts if the slab’s too thin for long bolts. Use washers to spread the load and lock washers or threadlocker to prevent loosening.
For wooden legs, use hardwood dowels, mortise-and-tenon, or pocket screws with glue for permanent joints. Reinforce with screws from beneath when possible.
Pre-drill all holes to avoid splitting. Square each leg to the table, and recheck alignment before final tightening.
Sanding Progression for a Silky Top
If you want a silky, mirror-smooth top, you’ll need a deliberate sanding progression that removes tool marks and blends the grain without sanding through the live edge’s character. Start coarse to level high spots, refine to erase scratches, and finish with an ultra-fine grit for sheen. Keep the sander moving and check flatness frequently.
- 80–120 grit: flatten and remove planer marks; use light passes on thin areas.
- 150–220 grit: smooth transitions and blend sapwood with heartwood.
- 320–400 grit: hand-sand contours and wipe with a tack cloth before finishing.
Preserve and Finish the Live Edge
Want the live edge to stand out while staying protected? Treat it gently: clean loose bark and dirt with a soft brush, avoid aggressive scraping that scars sapwood.
Stabilize fragile sections with CA glue or clear epoxy resin sparingly, filling voids to prevent future flaking.
Sand minimal contact areas by hand to smooth rough spots while preserving natural texture.
Apply a penetrating stabilizer or clear sealer formulated for raw edges to lock in moisture and resist insects—brush into crevices and wipe excess.
Let cures fully between coats, then lightly buff to even the sheen without altering the edge’s character.
Choosing a Tabletop Finish: Oil, Poly, or Epoxy
You’ll want to decide whether you prefer the natural warmth of an oil finish or the hard-shell protection of poly or epoxy. Oil soaks in and enhances grain while staying repairable.
Polyurethane gives durable, clear protection and epoxy creates a thick, glossy barrier that can fill voids.
Consider how the table will be used and how much maintenance you’ll accept before choosing.
Oil: Natural Warmth
Although oil won’t give you the glossy, plastic-like surface of epoxy, it soaks into the wood and brings out a warm, natural depth that many people prefer for live edge tables. You’ll apply oil in thin coats, wipe off excess, and let it cure; repeating builds protection without masking grain.
Oils like tung or Danish enhance color, feel silky, and repair easily. Expect periodic reapplication rather than a one-time seal.
Use a tack cloth before finishing, test on scrap, and follow safety directions.
Consider oil if you want tactile warmth and an authentic, understated look.
- Enhanced grain and color
- Easy touch-ups
- Natural feel
Epoxy vs Polyurethane
When choosing between epoxy and polyurethane for your live edge tabletop, think about how you use the piece: epoxy gives a thick, glass-like, moisture-proof surface that hides small imperfections and lets you create dramatic fills or river tables.
While polyurethane offers durable, thin-film protection that keeps the wood’s texture and is easier to repair or refinish.
You’ll pick epoxy if you want a seamless, glossy top and don’t mind longer curing, heavier weight, and careful temperature control.
Choose polyurethane if you prefer a more natural feel, quicker application, simpler touch-ups, and lower cost.
Match finish to function and maintenance expectations.
How to Apply Finishes for Durability
Because your live edge table will face daily wear, choosing and applying the right finish is essential to long-term durability. You’ll prep by sanding to 220 grit, removing dust, and ensuring the surface is dry and clean.
Because your live edge table sees daily wear, choose the right finish and prep carefully for lasting durability.
Apply thin, even coats, following manufacturer dry times and sanding lightly between coats for adhesion. Use brushes or foam applicators appropriate to the finish. For edges, work carefully to avoid drips.
Finish with a protective topcoat if needed, then let cure fully before use.
- Test finish on scrap first
- Follow label instructions exactly
- Allow full cure time before use
Prevent Blotching and Other Finishing Problems
A smooth sanding and proper application cut your risk of runs, but blotching and other finish problems can still derail a project if you don’t take a few extra precautions. Test finishes on scrap from the same board, use a grain filler or conditioner on porous species, and apply thin, even coats. Watch humidity and temperature; slow drying often worsens blotchiness. If tannin bleed appears, use a stain-blocking primer before topcoats. Repair small defects by spot-sanding and reapplying finish.
| Emotion | Tip |
|---|---|
| Relief | Test first |
| Confidence | Use conditioner |
| Control | Thin coats |
| Calm | Monitor environment |
Sanding and Sealing Epoxy Fills Correctly
Before you sand epoxy fills, let them cure fully to avoid gummy edges and uneven compaction. You’ll check hardness by fingernail testing and manufacturer’s cure time.
Start with a coarse grit to level high spots, then progress to finer grits to remove scratches. Keep sanding flat to avoid hollows; use a sanding block or orbital sander with dust collection.
Clean thoroughly between grits, then tack cloth.
Seal with a compatible topcoat—polyurethane or catalyzed varnish—applied thinly in multiple coats, sanding lightly between coats.
Final polish brings clarity and smoothness to the epoxy surface.
- Prepare: verify cure and mask surrounding wood
- Sand: coarse→fine, keep flat
- Seal: compatible thin coats, sand between
Designing for Seasonal Movement and Stability
When you design a live-edge table, account for seasonal wood movement up front so the top can swell and shrink without stressing joints or splitting.
Design live-edge tables for seasonal movement so the top can swell and shrink without stressing joints.
Plan joinery that allows movement: floating tenons, slotted aprons, or figure-eight bow ties set loosely.
Attach the top to the base with screws in elongated slots or slotted tabletop fasteners, not rigid glue across the whole surface.
Dimension components for expected humidity ranges and leave small gaps at mating edges to prevent binding.
Level and brace the base to resist racking while still allowing the top to move.
Test fit assemblies before final finishing.
Troubleshoot Cracks, Cupping, and Checking
When you spot cracks, start by identifying their causes—stress, drying rate, or unstable support.
If the slab is cupping, check moisture differences and adjust drying or add strategically placed biscuits, splines, or a flatter substrate to flatten it.
To prevent future checking, stabilize humidity, use proper end grain sealing, and choose suitable joinery for seasonal movement.
Identify Crack Causes
Why is your slab cracking, cupping, or checking? You need to identify causes before repair so you won’t repeat mistakes. Inspect moisture content, drying patterns, and support conditions. Note where cracks start and how checks run relative to growth rings.
- Uneven drying — Rapid or uneven moisture loss causes tension and radial cracks.
- Improper storage — Slabs stacked without stickers or exposed to sun/wind cup as one side dries faster.
- Structural stress — Bowing, unsupported spans, or mounting points concentrate loads and initiate checking.
Record findings, take photos, and measure moisture to plan targeted remedies next.
Fix Cupping Issues
Ever wondered how to flatten a cupped slab without making the cracks worse? Start by evaluating moisture content—only work when both slab and shop are near equilibrium.
Mount the slab on a flat sled or cauls to prevent twisting.
Remove high spots slowly with a plane or router sled, checking progress frequently.
Stabilize existing cracks with epoxy or butterfly keys before heavy surfacing to keep them from widening.
Alternate removing material from both faces if possible to balance stresses.
Finish by sanding gradually and rechecking moisture; small adjustments now prevent major distortions later.
Prevent Future Checking
After stabilizing cracks and getting the slab flat, plan steps that keep wood from checking again: control moisture both before and after finishing, seal end grain immediately, and avoid leaving thin cantilevered edges that dry faster than the core.
You’ll want a stable environment while the slab acclimates, then use a finish that balances vapor transmission with protection.
Keep the slab off concrete, use stickers to promote even airflow, and monitor humidity.
Address stress points with splines or bowties if grain runs outboard.
Be proactive: small preventative steps save large repairs later.
- Seal end grain promptly
- Control humidity cycles
- Avoid thin, unsupported edges
Transport and Install a Heavy Live-Edge Table
When you’re ready to move a heavy live-edge table, plan the transport and installation step-by-step so you avoid damage and injury. Measure doorways, stairways, and vehicle clearance. Secure padding—moving blankets, foam, or cardboard—around edges and legs to protect the finish.
Use strong lifting straps and at least two helpers; consider a furniture dolly for long distances. Lift with knees, keep the table vertical if narrow, and avoid twisting.
Fasten the table in the truck with ratchet straps and soft loops. At the destination, assemble supports, level the table with shims, then confirm stability before use.
Cleaning, Re-Oiling, and Seasonal Maintenance
Although your live-edge table is built to last, regular cleaning, timely re-oiling, and a few seasonal checks will keep the wood stable and looking its best.
Wipe spills immediately with a soft cloth and mild soap; avoid ammonia or harsh cleaners.
Check joins and fasteners seasonally and tighten as wood moves.
Re-oil thinner or satin finishes every 6–12 months: sand lightly, remove dust, apply oil evenly, wipe excess, and cure.
- Clean: soft cloth, mild detergent, dry promptly.
- Re-oil: light sanding, thin coats, follow product cure times.
- Seasonal: inspect moisture, hardware, and finish integrity.
Live-Edge Customizations: Inlays, Resin, and Mixed Media
Once you’ve got cleaning and maintenance under control, you can start personalizing the slab with inlays, resin fills, and mixed-media accents that highlight the wood’s character.
With cleaning handled, personalize your slab using inlays, resin fills, and mixed-media accents to enhance its character.
Choose inlay materials—metal, contrasting hardwood, or mother-of-pearl—to trace cracks or create patterns. Rout precise channels, dry-fit pieces, then glue and sand flush.
For resin, stabilize edges, tape the underside, mix pigment or metallic powder, and pour in thin layers to avoid overheating. Degas and level between pours.
Mixed media like stone, glass, or leather can be embedded for texture.
Finish and buff carefully to preserve both materials’ integrity and sheen.
Time-Saving Techniques for First-Time Builders
If you want to finish a live-edge table without wasting time, focus on planning, batching tasks, and using jigs or templates to cut down on repeat work. A clear sequence—measure, cut, flatten, glue, and finish—keeps you from backtracking.
You’ll save hours by prepping materials, marking cuts, and organizing clamps and finishes before you start. Use simple jigs for repeat cuts, a router sled for flattening, and pre-mixed finish to speed drying.
Work in stages so glue-ups, sanding, and finishing overlap efficiently.
- Prep and mark everything.
- Batch cuts and sanding.
- Use jigs/templates.
Common Beginner Mistakes and How to Avoid Them
When you rush or skip basics, small mistakes compound into big problems—warped slabs, blown-out edges, weak glue joints, and uneven finishes are the usual culprits. You can prevent most by measuring twice, clamping properly, acclimating wood, and testing tools. Sand progressively, avoid aggressive cuts, and use slow, even glue pressure. Check moisture, flatten in stages, and protect edges during routing. Practice on scraps before committing. Visualize fixes with this quick table:
| Mistake | Quick Fix |
|---|---|
| Warping | Clamp and flatten |
| Blown edge | Backer board |
| Weak joint | Proper glue/pressure |
Quick Build Checklist to Finish Your Live-Edge Table
Before you wrap up your live-edge table, run through an essential materials checklist so you’re sure nothing’s missing.
Then follow the final finishing steps—sanding sequence, sealer choice, and hardware installation—to lock in the look and durability.
If anything’s unclear, pause and double-check those items before you call the project done.
Essential Materials Checklist
Although the final sanding and finish will make the grain pop, you’ll need the right tools and supplies to get there — a sturdy slab or slabs of live-edge wood, a planer or hand plane, belt or orbital sanders with a range of grits, quality epoxy or wood glue, clamps in various lengths, a straightening bar or jointer, screws or bolts for your chosen base, a level and square, finish (oil, polyurethane, or resin), brushes or rags, safety gear (gloves, respirator, eye protection), and measuring and marking tools.
Gather these essentials before you start cutting or joining slabs.
- Select slab, base hardware, and fasteners.
- Stock abrasives, glue, and clamps.
- Prep safety and measuring kit.
Final Finishing Steps
Once you’ve sanded to a smooth, even surface and filled any voids, it’s time to lock in the look and protect the wood—this checklist walks you through the last steps so nothing gets missed.
Check grain direction, wipe away dust with a tack cloth, and apply a thin, even coat of finish (oil, varnish, or polyurethane) with a clean applicator.
Let dry per manufacturer instructions, sand lightly between coats with fine grit, and remove all residue.
Apply 2–4 coats for durability.
Attach hardware and base, tighten fasteners, and inspect edges.
Cure fully before regular use.
Frequently Asked Questions
How Do I Transport a Slab Home Without Damaging It?
You’ll secure the slab upright on a sturdy A‑frame, pad contact points with blankets and foam, strap it tightly, use a helper, avoid sudden stops, drive slowly, and unload carefully to prevent cracks or edge damage.
Can Live-Edge Slabs Be Used Outdoors or on Covered Patios?
Yes — you can use live-edge slabs outdoors or on covered patios if you seal and finish them properly, use weather‑resistant species, elevate from direct ground contact, and plan for periodic maintenance to prevent moisture and UV damage.
Will the Table Emit Odors as the Slab Continues to Dry?
Yes — the slab can emit odors as it continues drying, especially if it’s green or had bark. You’ll notice milder musty or sap smells; they’ll fade with time, ventilation, and proper sealing or kiln drying.
Can I Reproduce the Live-Edge Look Using Plywood/Laminate?
Yes — you can mimic a live-edge with plywood and laminate by layering veneer, carving or sanding the edge profile, adding epoxy or resin for texture, staining for grain, and sealing; it won’t be identical but looks convincing.
How Do I Insure or Appraise a Custom Live-Edge Table?
You insure a custom live-edge table by documenting provenance, materials, and receipts, photographing condition, getting a professional appraisal, and adding it to homeowners or scheduled personal property coverage; you’ll keep appraisal updates and storage records.
Conclusion
You’ve got everything you need to build a striking live-edge table: a clear outcome, realistic time and skill expectations, and tips for choosing and evaluating slabs. Trust your eye for grain and edge character, avoid common slab defects, and try simple customizations like resin accents or metal legs. Use time-saving techniques, learn from beginner mistakes, and follow the quick checklist to finish confidently. Get started—your handcrafted table will be worth the effort.